OpenStack Home Lab Part 4: Switcheroo 2: Trunk Boogaloo
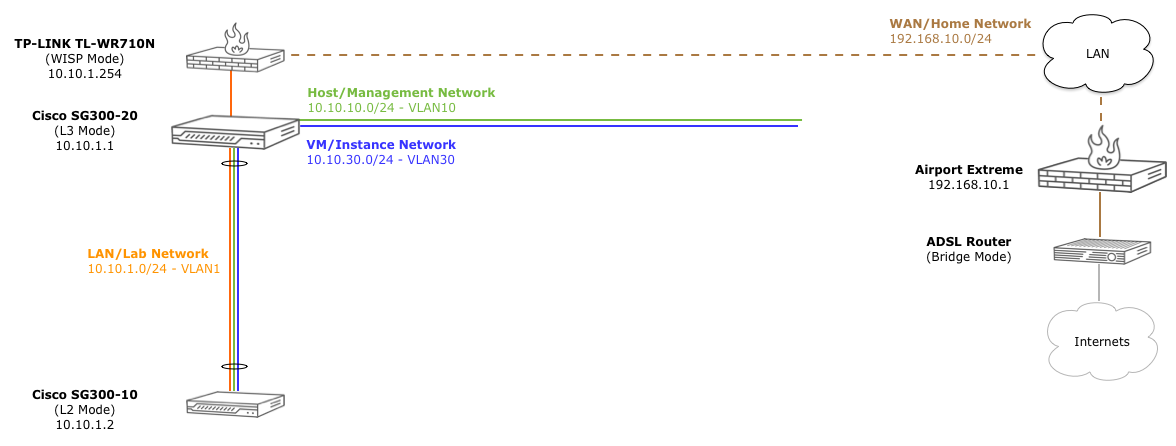
In the last post, we configured our SG300-20 from scratch with all the vlans, internet access, and other goodness. Now it’s time to start configuring our SG300-10 switch to have the same vlans, a subset of the same ports, and trunk those ports vlans to the main switch.
For the sake of not having to switch between pages, most of the content here is exactly the same as Part 3 when we configure the SG300-20.
Connecting to the switch
Because this new switch has dhcp enabled by default, and the SG300-20 has dhcp running for vlan1, we could plug it in and go. But, let’s configure it unconnected first and assign a specific ip manually to vlan1.
→ ls /dev/*PL*
crw-rw-rw-  1 root  wheel   18,   5 Apr 30 16:19 /dev/cu.PL2303-000013FD
crw-rw-rw-  1 root  wheel   18,   4 Apr 30 16:19 /dev/tty.PL2303-000013FD
Once you find the right device, we can use screen to connect to the switch, passing it the device, baud rate, bits, parity, and stop bit. Hit <CR> twice to kick off the auto detect, and use the default username/password (cisco/cisco)
→ screen /dev/tty.PL2303-000012FD 115200 8N1

<CR><CR>
Detected speed: 115200

User Name:cisco
Password:*****

Please change your password from the default settings. Please change the password for better protection of your network.
Do you want to change the password (Y/N)[Y] ?Y
Enter old password  : *****
Enter new password  : ***********
Confirm new password: ***********

switchc72a1d#
We will leave this switch and L2 (Switch) mode, but configure all of the other niceties, like dns, sntp, etc.
Change the Hostname
switchc72a1d#conf t
switchc72a1d(config)#hostname
  WORD                 This system's network name
switchc72a1d(config)#hostname SG300-10
SG300-10(config)#exit
SG300-10#
And just for giggles, let’s save our config:
SG300-10#copy run start
Overwrite file [startup-config].... (Y/N)[N] ?Y
12-Jan-2014 18:06:05 %COPY-I-FILECPY: Files Copy - source URL running-config destination URL flash://startup-config
12-Jan-2014 18:06:08 %COPY-N-TRAP: The copy operation was completed successfully
Copy succeeded
Next!
VLAN1/Native VLAN Addressing
Let’s get this thing on the same network as the SG200-20 (10.10.1.0/24). As we see below, the default out of the box is 192.168.1.0/24 with dhcp client enabled:
SG300-10#show ip ?
  arp                  ARP information
  dhcp                 IP DHCP information
  helper-address       UDP relay information
  http                 HTTP configuration
  https                HTTPS configuration
  igmp                 IGMP information
  interface            IP interface status and configuration
  route                Display the IP routing table
  source-guard         Show IP Source Guard status
  ssh                  Display the configuration of the SSH server component
  ssh-client           secure shell client.

SG300-10#show ip interface


    IP Address         I/F      I/F Status      Type     Directed   Precedence   Status
                                admin/oper               Broadcast
------------------- ---------- ------------- ----------- ---------- ---------- -----------
0.0.0.0/32          vlan 1     UP/UP         DHCP        disable    No         Not received
192.168.1.254/24    vlan 1     UP/UP         Default     disable    No         Valid
To do that, we simply need to change the ip address interface for vlan 1 (“native” vlan):
SG300-10#config t
SG300-10(config)#interface vlan 1
SG300-10(config-if)#ip address 10.10.1.2 255.255.255.0
SG300-10(config-if)#exit
SG300-10(config)#exit
SG300-10#show ip interface


    IP Address         I/F      I/F Status      Type     Directed   Precedence   Status
                                admin/oper               Broadcast
------------------- ---------- ------------- ----------- ---------- ---------- -----------
10.10.1.2/24        vlan 1     UP/UP         Static      disable    No         Valid


SG300-10#copy run start
Overwrite file [startup-config].... (Y/N)[N] ?Y
If we get energetic in future posts, we can move these this interface to a “management” vlan and restrict the ssh/telnet/https administration to that vlan interface. For now, this will do.
Default Gateway (Internet Access)
While we don’t need to set the default gateway for host machines connected to this switch, it is still nice to this switch itself [and its sntp client] to know how to get to the internet on its own.
To get to the internet, we just have to tell the switch that the default gateway for unknown routes is the WAP, just like the SG300-20.
SG300-10#ping 8.8.8.8
Pinging 8.8.8.8 with 18 bytes of data:

PING: net-unreachable
PING: net-unreachable
PING: net-unreachable
PING: net-unreachable

----8.8.8.8 PING Statistics----
4 packets transmitted, 0 packets received, 100% packet loss
As expected, by default, no worky worky.
SG300-10#config t
SG300-10(config)#ip default-gateway 10.10.1.254
SG300-10(config)#exit

SG300-10#ping 8.8.8.8
Pinging 8.8.8.8 with 18 bytes of data:

18 bytes from 8.8.8.8: icmp_seq=1. time=60 ms
18 bytes from 8.8.8.8: icmp_seq=2. time=60 ms
18 bytes from 8.8.8.8: icmp_seq=3. time=60 ms
18 bytes from 8.8.8.8: icmp_seq=4. time=60 ms

----8.8.8.8 PING Statistics----
4 packets transmitted, 4 packets received, 0% packet loss
round-trip (ms) min/avg/max = 60/60/60
Hooray! We have the series of tubes at our disposal. Don’t forget to save your work (copy run start)
DNS Lookups
Now that we have a gateway, we should make sure that the switch itself can resolve DNS lookups for things like NTP server settings, etc. By default, the switch doesn’t know how to resolve domain names:
SG300-10#ping google.com
% Host not found in DNS database
MOAR RESOLUTIONS!
SG300-10(config)#ip domain lookup
SG300-10(config)#ip name-server 8.8.8.8
SG300-10(config)#exit
Sector 3 Grid 6. Enhance…
SG300-10#ping google.com
Pinging google.com (74.125.225.7) with 18 bytes of data:

18 bytes from 74.125.225.7: icmp_seq=1. time=40 ms
18 bytes from 74.125.225.7: icmp_seq=2. time=40 ms
18 bytes from 74.125.225.7: icmp_seq=3. time=40 ms
18 bytes from 74.125.225.7: icmp_seq=4. time=40 ms

----74.125.225.7 PING Statistics----
4 packets transmitted, 4 packets received, 0% packet loss
round-trip (ms) min/avg/max = 40/40/40
So endeth the trick.
NTP Client/Clock Sync
Time for… time.
SG300-10#show clock
*18:23:17 UTC May 2 2014
No time source
Time from Browser is disabled
Interesting. It’s not as wrong as the last switch. :-/
SG300-10(config)#clock source sntp
SG300-10(config)#clock timezone EST -5
SG300-10(config)#clock summer-time EDT recurring usa
SG300-10(config)#sntp unicast client enable
SG300-10(config)#sntp unicast client poll
SG300-10(config)#sntp server time-b.nist.gov poll
SG300-10(config)#sntp server time-b.nist.gov poll
SG300-10(config)#sntp server nist1-ny2.ustiming.org poll
SG300-10(config)#exit
I Can Haz Time?
SG300-10#show clock detail
 21:31:24 EDT  May 6 2014
Time source is sntp
Time from Browser is disabled

Time zone (Static):
Acronym is EST
Offset is UTC-5

Summertime (Static):
Acronym is EDT
Recurring every year.
Begins at second Sunday of Mar at 02:00.
Ends at first Sunday of Nov at 02:00.
Offset is 60 minutes.


DHCP timezone: Disabled
Poll me!
SG300-10#show sntp status

Clock is synchronized, stratum 1, reference is nist1-ny2.ustiming.org, unicast

Unicast servers:

Server            : nist1-ny2.ustiming.org
  Source          : Static
  Stratum         : 1
  Status          : up
  Last Response   : 21:30:44.0 EDT May 6 2014
  Offset          : 1058.1680293 mSec
  Delay           : 0 mSec

Server            : time-b.nist.gov
  Source          : Static
  Stratum         : 1
  Status          : up
  Last Response   : 21:30:44.0 EDT May 6 2014
  Offset          : 1057.4507698 mSec
  Delay           : 0 mSec
Don’t forget to save your config! :-)
Create VLAN10, 20, 30
Before we can create our trunk port that will carry all traffic to the SG300-20, we need to create the same vlans on this switch:
SG300-10#conf t
SG300-10(config)#vlan 10
SG300-10(config)#vlan 20
SG300-10(config)#vlan 30

SG300-10#show vlan

Vlan       Name                   Ports                Type     Authorization
---- ----------------- --------------------------- ------------ -------------
 1           1                gi1-10,Po1-8           Default      Required
 10         10                    gi10                static      Required
 20         20                    gi10                static      Required
 30         30                    gi10                static      Required
For brevity, I’ve left out the configuration of the vlan names themselves. Feel free to do the same things you did in part 2 here.
Now we can create our trunk port on port 10, which we will connect to the trunk port on the SG300-20 (port 19):
SG300-10(config)#int gi10
SG300-10(config-if)#switchport mode trunk
SG300-10(config-if)#switchport trunk allowed vlan add all
SG300-10(config-if)#exit
SG300-10(config)#exit

SG300-10#show interface switchport gi10
Port : gi10
Port Mode: Trunk
Gvrp Status: disabled
Ingress Filtering: true
Acceptable Frame Type: admitAll
Ingress UnTagged VLAN ( NATIVE ): 1

Port is member in:

Vlan               Name               Egress rule Port Membership Type
---- -------------------------------- ----------- --------------------
 1                  1                  Untagged          System
 10                 10                  Tagged           Static
 20                 20                  Tagged           Static
 30                 30                  Tagged           Static
Now for realz, plug the SG300-10 port 10 into the SG300-20 port 19 and behold!
02-May-2014 15:05:45 %LINK-I-Up:  gi10
02-May-2014 15:05:45 %LINK-I-Up:  Vlan 1
02-May-2014 15:05:45 %LINK-I-Up:  Vlan 10
02-May-2014 15:05:45 %LINK-I-Up:  Vlan 20
02-May-2014 15:05:45 %LINK-I-Up:  Vlan 30
02-May-2014 15:05:45 %STP-W-PORTSTATUS: gi10: STP status Forwarding
Now if you plug your ethernet cable into any of the ports 1-9, you should get an address from dhcp pool “native” (10.10.1.0/24) and you should be able to get to the internets.
Save your config!
Configuring VLAN10, 20, 30 Access Ports
For this, we just need to set the switchport mode, access vlans, and portfast for the various ports:

SG300-10#conf t
SG300-10(config)#int range gi1,gi5
SG300-10(config-if-range)#spanning-tree portfast
SG300-10(config-if-range)#switchport mode access
SG300-10(config-if-range)#switchport access vlan 10
SG300-10(config-if-range)#exit
SG300-10(config)#int range gi2,gi6
SG300-10(config-if-range)#spanning-tree portfast
SG300-10(config-if-range)#switchport mode access
SG300-10(config-if-range)#switchport access vlan 20
SG300-10(config-if-range)#exit
SG300-10(config)#int range gi3-4,gi7-8
SG300-10(config-if-range)#spanning-tree portfast
SG300-10(config-if-range)#switchport mode access
SG300-10(config-if-range)#switchport access vlan 30
SG300-10(config-if-range)#exit
SG300-10(config)#exit
which should end up looking like this:
SG300-10#show vlan

Vlan       Name                   Ports                Type     Authorization
---- ----------------- --------------------------- ------------ -------------
 1           1                gi9-10,Po1-8           Default      Required
 10       oshost              gi1,gi5,gi10            static      Required
 20       osdata              gi2,gi6,gi10            static      Required
 30        osvm             gi3-4,gi7-8,gi10          static      Required
Easy peasy vlan cheesey.
Plug In Some Cables
Now, let’s see if this all works. First, let’s connect our ethernet port to port 9 (still native vlan) and see if we get the right DHCP info from vlan1 on the switch:
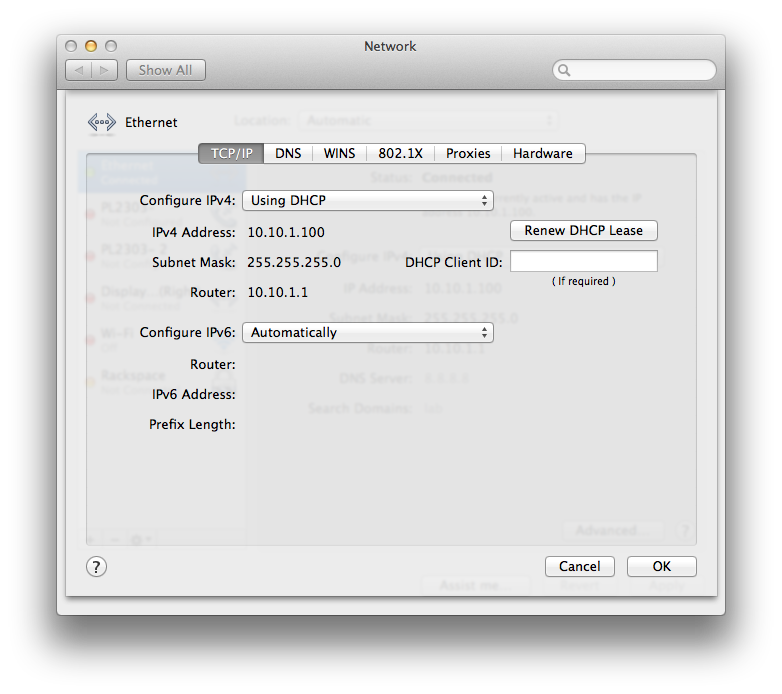
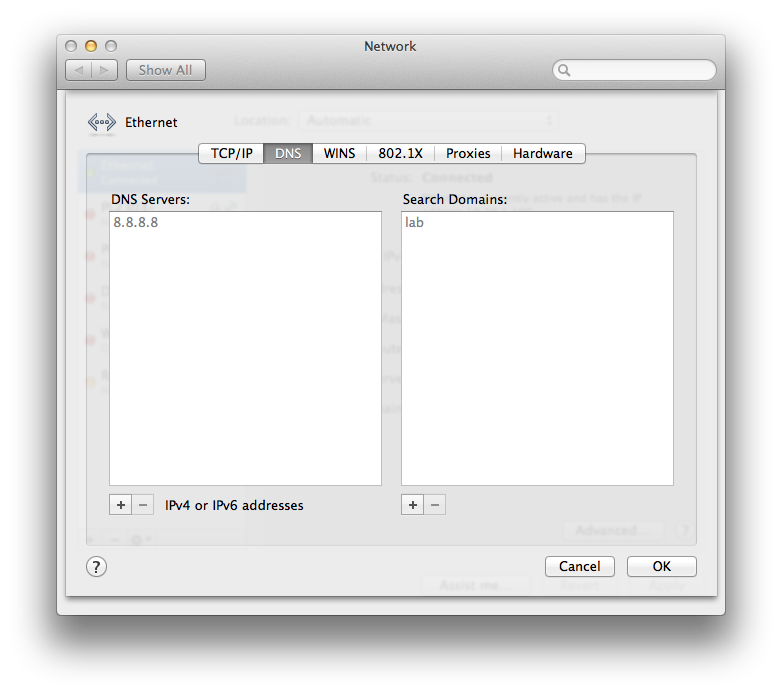
Nice! vlan1 ip and router, dns servers, and default domain name. Now, let’s connect our ethernet port to and of the vlan10 (oshost) ports (1,5):
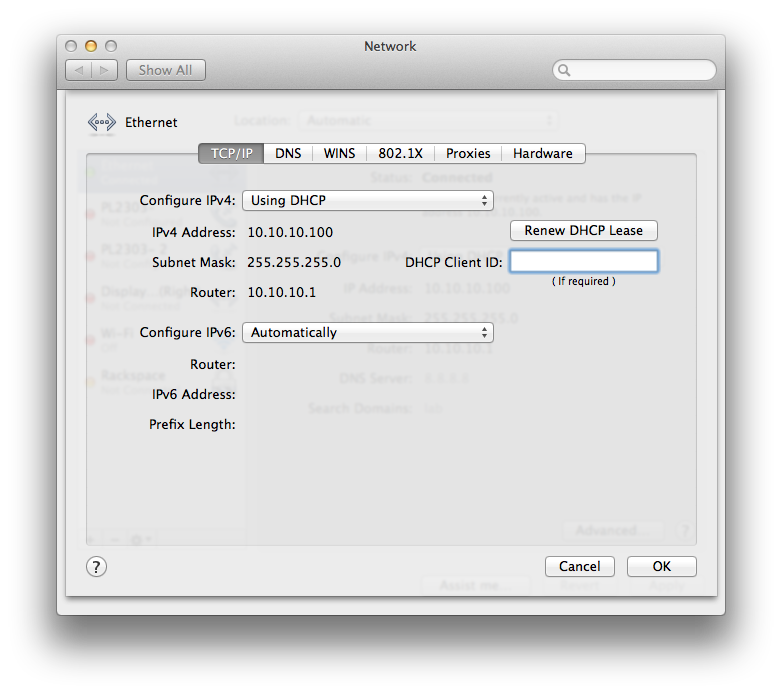
Winning! If you’ve created vlan20/30, give those a shot as well. Also, if we now connect to the WAP via wifi, we should also get a 10.10.1.x address from the switches dhcp server on vlan1.
Now don’t do what I did, which is forget to save your config and wonder why is wasn’t working a week later :-)
Next Time on This Old Homelab
Next up, we’ll start configuring our PXE/FOG to get our first OS installed over the newly formed network.