Welcome to part 3 of MVC Marathon,
a multipart excursion into creating an application in the major
MVC frameworks available today.
The source code for this part can be found here:
http://github.com/claco/mvc-marathon/tree/part3/
Part 3: Creating a Restaurants Controller and View
In our last installment, we created a database, schema and model
to get at our list of restaurants. In this episode, I’m going to
create a controller and view that uses that model to list the
restaurants in our database. Where available, I will also use
any existing CRUD/scaffolding to enter some test data.
You can jump to any specific framework using the links below.
ASP.NET MVC
While .NET 3.0 and MVC have made a lot of strides with LINQ and
Entity Framework (ORM), they completely lack any kind of
scaffolding or helpers for data management. I’m sure someone is
working on it, and there are 3rd party package available. For now,
we’ll stick to just creating a controller for the restaurants.
Update: I dropped the ball on this one. There is the new Dynamic Data scaffolding in .NET 3.5. It appears that you can create an entirely separate Dynamic Data site, or try and work it into an existing site. As it stands, a separate site doesn’t count as part of the MVC solution, and the steps to integrate it are woefully long and complicated. I declare that the same as no real new user friendly solution for the context of this series.
Creating the Data
Before we create our controller, we need to add some test data.
First, Double-Click the BurningPlate.mdf file in the App_Data
directory to open the Server Explorer pane. Right-Click on the
Restaurants table and select “Show Table Data”.
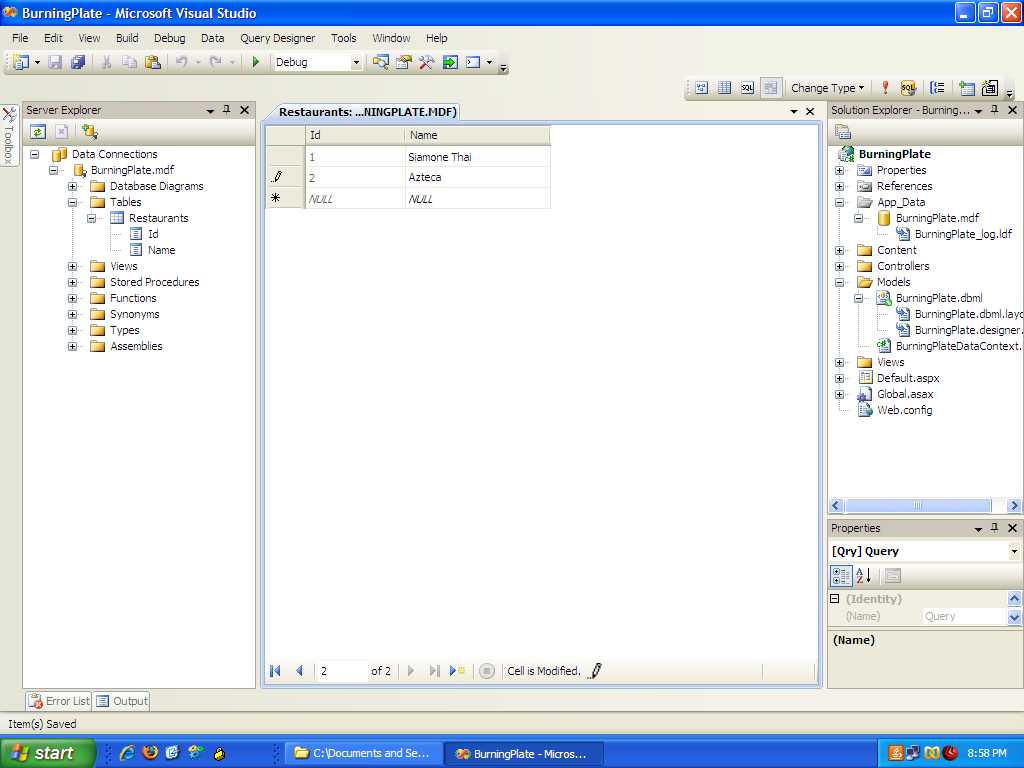
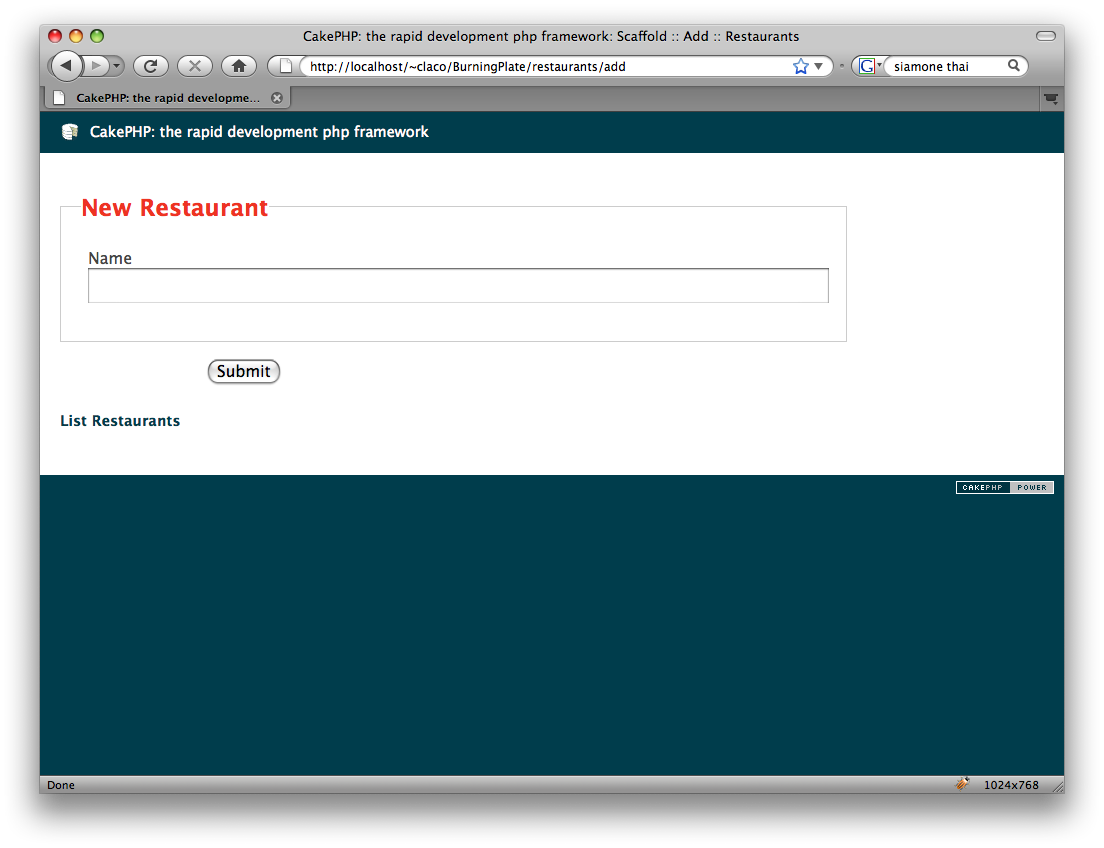
Now enter two restaurants into the Name field: “Siamone Thai”
and “Azteca”.
Creating the Controller
Now that we have our test data, we’re going to create a controller
to list that data. Right-Click on the Controllers folder and choose
“Add New Item”.
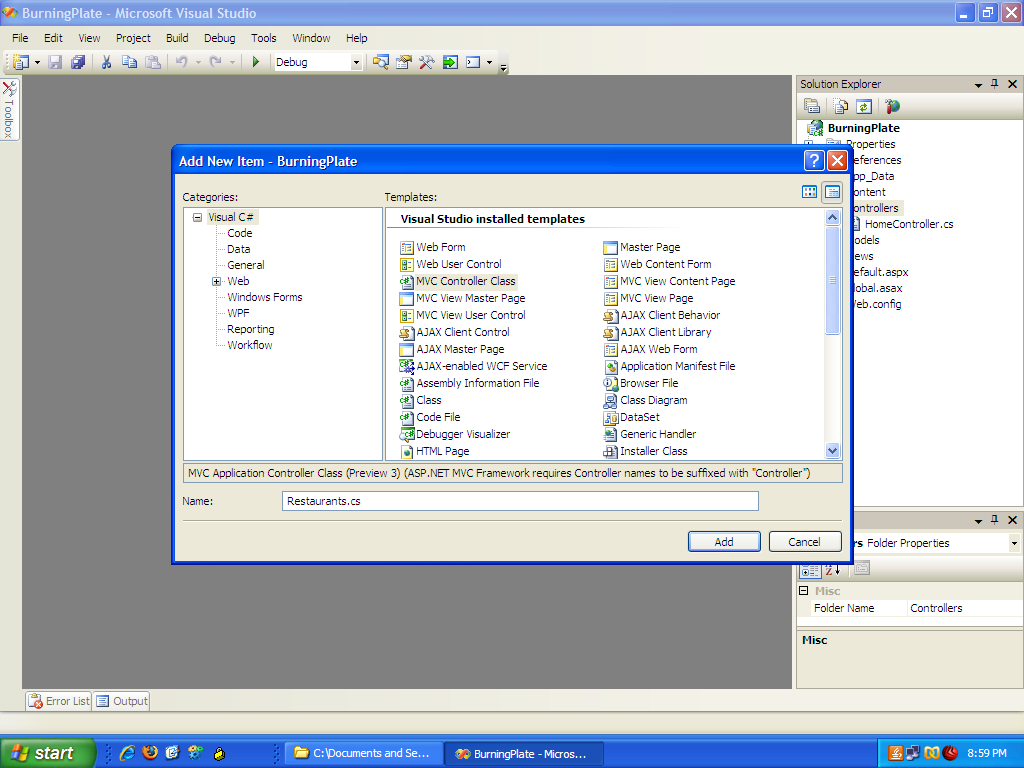
Select “MVC Controller Class”, type RestaurantsController.cs for
the name and click “Add”. By convention in .NET MVC, the controller
class name should always end in Controller. The default routing
will assume that any controller path named /foo/ will map to the
controller FooController. This of course can be changed by tweaking
the routing, but why create more work for yourself?
Much like inflection to relate models to tables automatically,
controller and view naming is typically referred to as “convention
or configuration”. You can follow naming conventions and have things
“Just Work”, or you can usually deviate from the norm and use
configuration to over come situations where you need t name things
differently.
Update: The file name in the add item dialog above is wrong. :-)
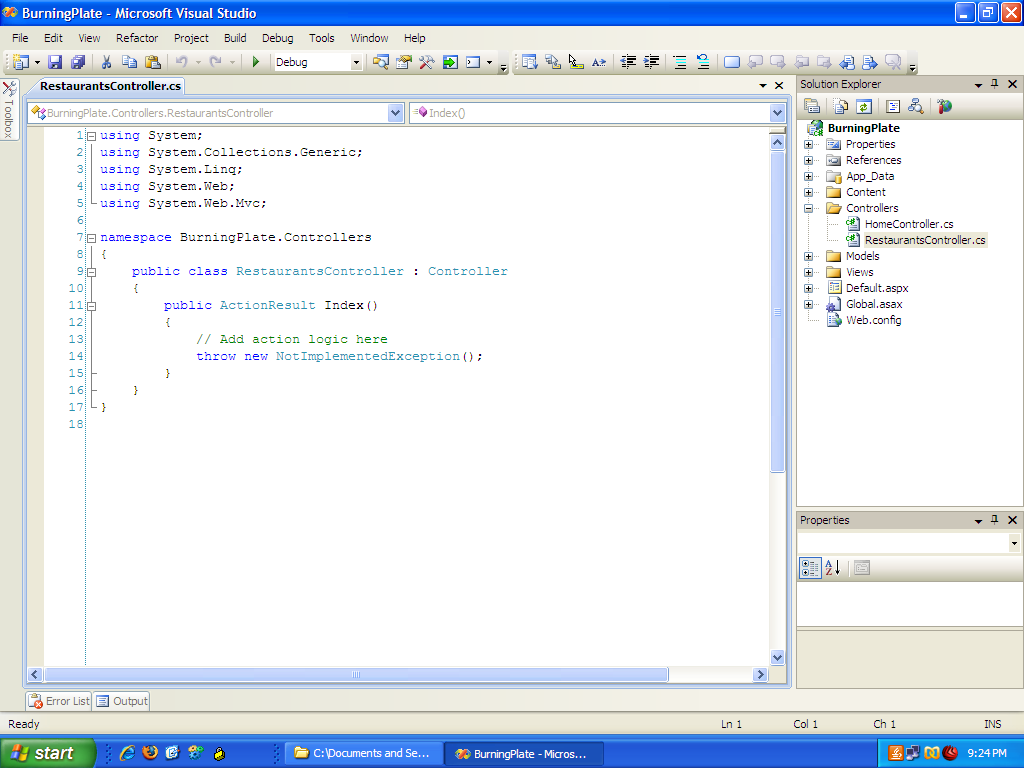
Now we have a shiny new controller class that by default spits
out a NotImplementedException. Let’s add some code to get a list
of restaurants and feed that to a view.
public ActionResult Index()
{
BurningPlateDataContext db = new BurningPlateDataContext();
List<Restaurant> restaurants = db.Restaurants.ToList(); return View(restaurants);}
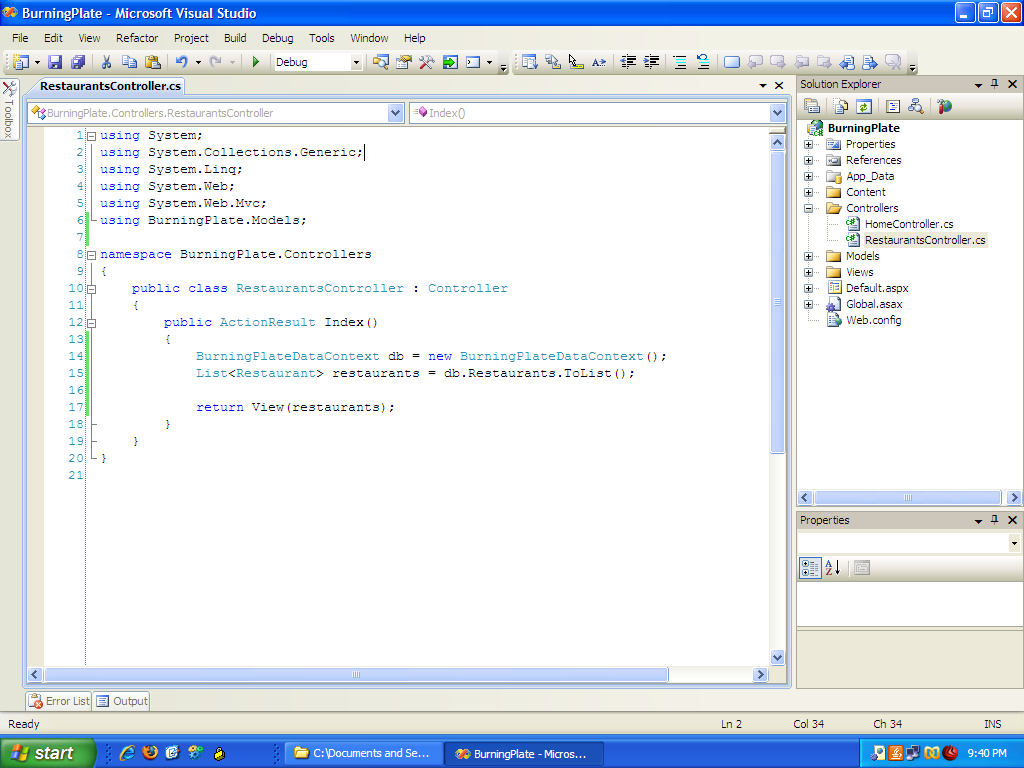
In the code above, all we’ve had to do is instantiate an instance
of the BurningPlateDataContext class that was auto generated when
we created our Model.
Then we asked it for a list of restaurants using ToList. Finally,
we passed that list of restaurants to the View method.
Explore the View method when you have time. It has many options,
and there is more than one way to get data into a view. In our case
we’ve chosen to pass the restaurants list using the Model parameter.
You can also pass it in the ViewData itself. I personally think
that the main model data should be passed in the Model, and ViewData
is reserved for all of the extra information like page titles,
meta tag keywords, links, etc.
Creating the View
Now that we have a controller that assembles the data, we need
a way to display it. My much like the routes to controller mappings,
.NET MVC will look for a view matching the ControllerName/Action
path. Since our controller is Restaurants and our action is Index,
we need to create an Index view in the Restaurants folder.
Just like the routing naming conventions, this can also be customized
to use views with alternate names and in alternate locations using the
various View method options.
To create the view, Right-Click the Views folder and create a
folder called “Restaurants”. Right-Click that new folder and select
“Add Item”.
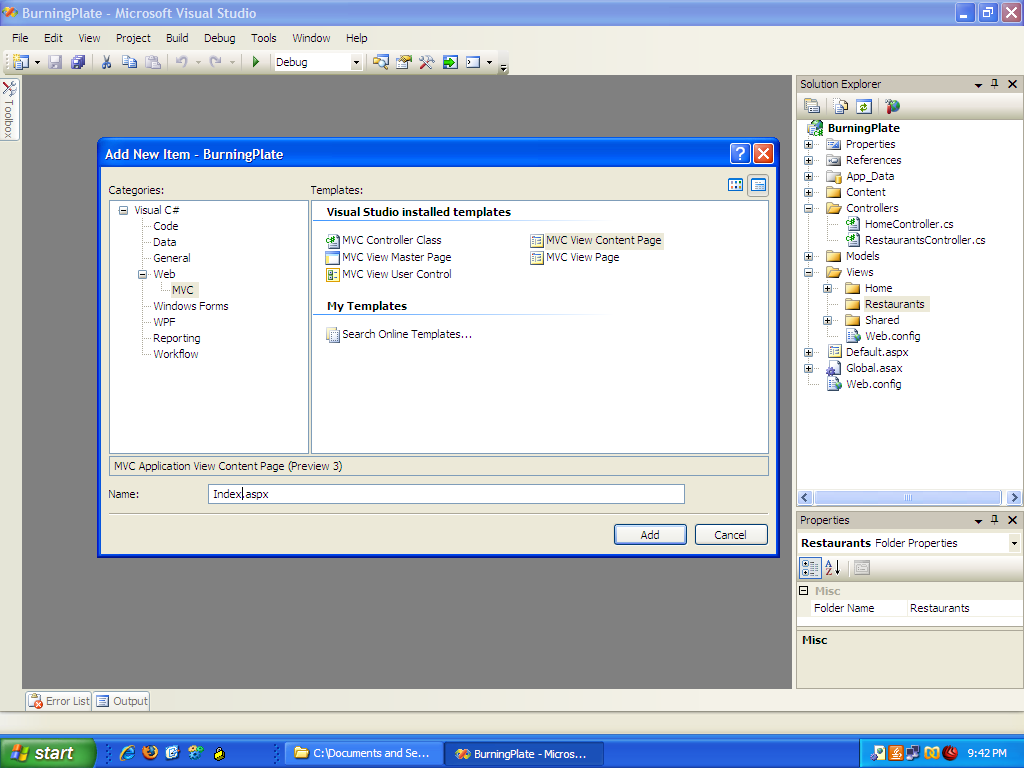
Because .NET MVC supports master pages (wrapper templated layouts)
by default, select “MVC View Content Page” and name it after our
default RestaurantController method “Index” and click “Add”. You
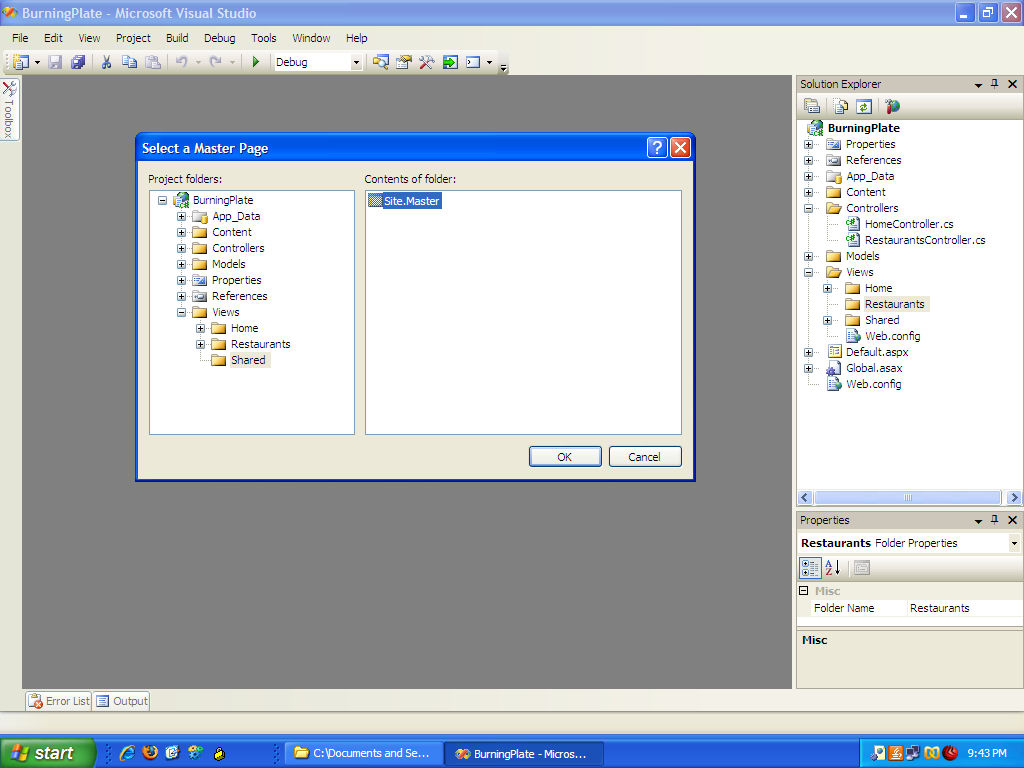
will then be prompted to select a master page. Select the “Site” master
page in the Shared folder and click “OK”.
Now that we have a new view page, we need to tell it about the
type of model data we’re passing it from the controllers View method
call in the controller. In our case, we’re passing a list o restaurants.
Right-Click on your new Index.aspx page and select “View Code”.
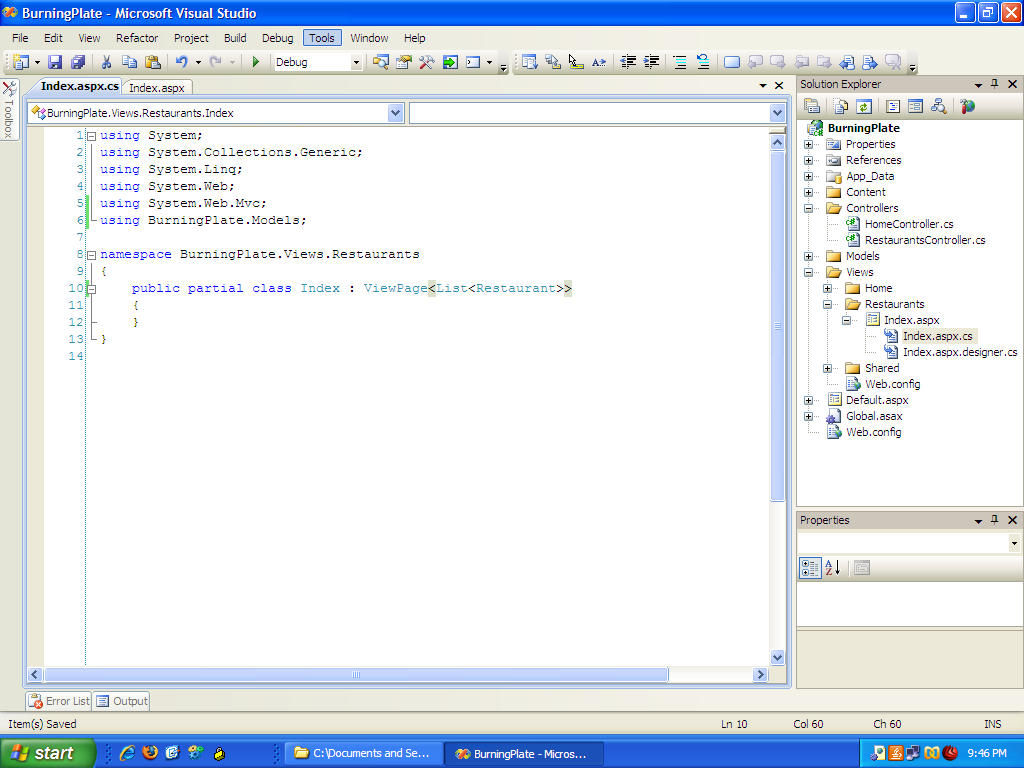
public partial class Index : ViewPage<List<Restaurant>>
To tell the view to expect a list of restaurants, we simply add
a type definition to the view class definition. In our case, that
means changing ViewPage to ViewPage<List<Restaurans>>.
This tells intellisense that when accessing the ViewData.Model
property that it is a List of Restaurants objects.
Now that we have told the page what the model is, we simply
need to add a loop to the template to display the list of restaurants.
Double-Click your Index.aspx file to open the page view.
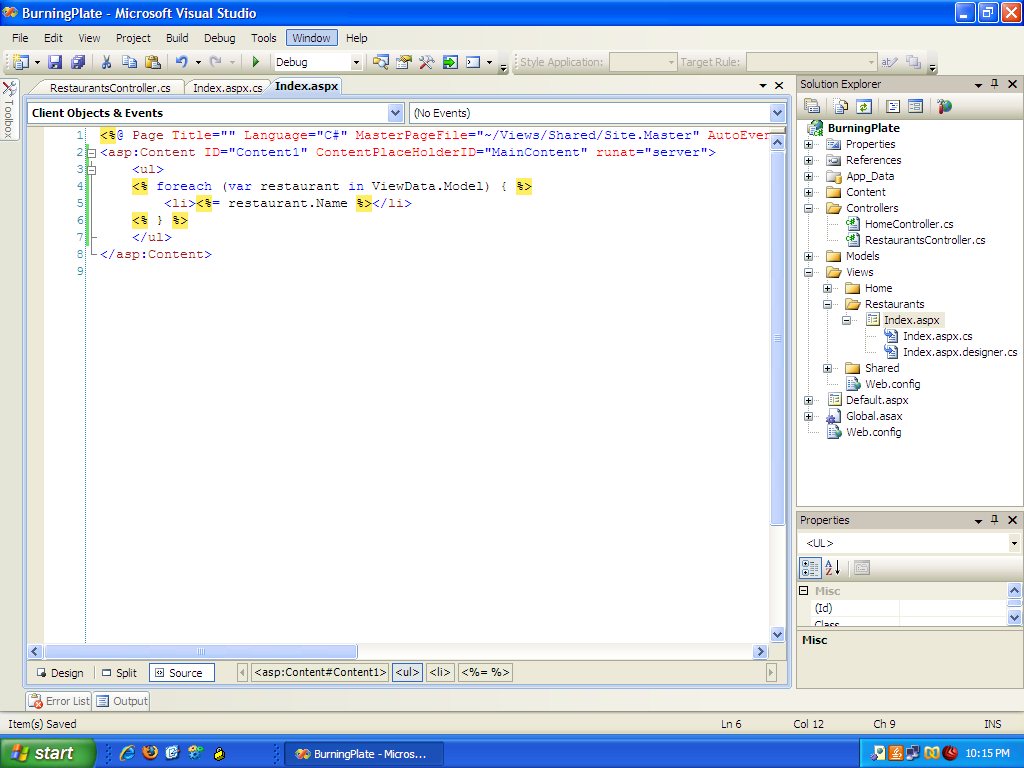
<ul>

<% foreach (var restaurant in ViewData.Model) { >

	<li><= restaurant.Name ></li>

< } %>

</ul>
In our view, we added a loop against the ViewData.Model and printed
out each restaurants name in an unordered list.
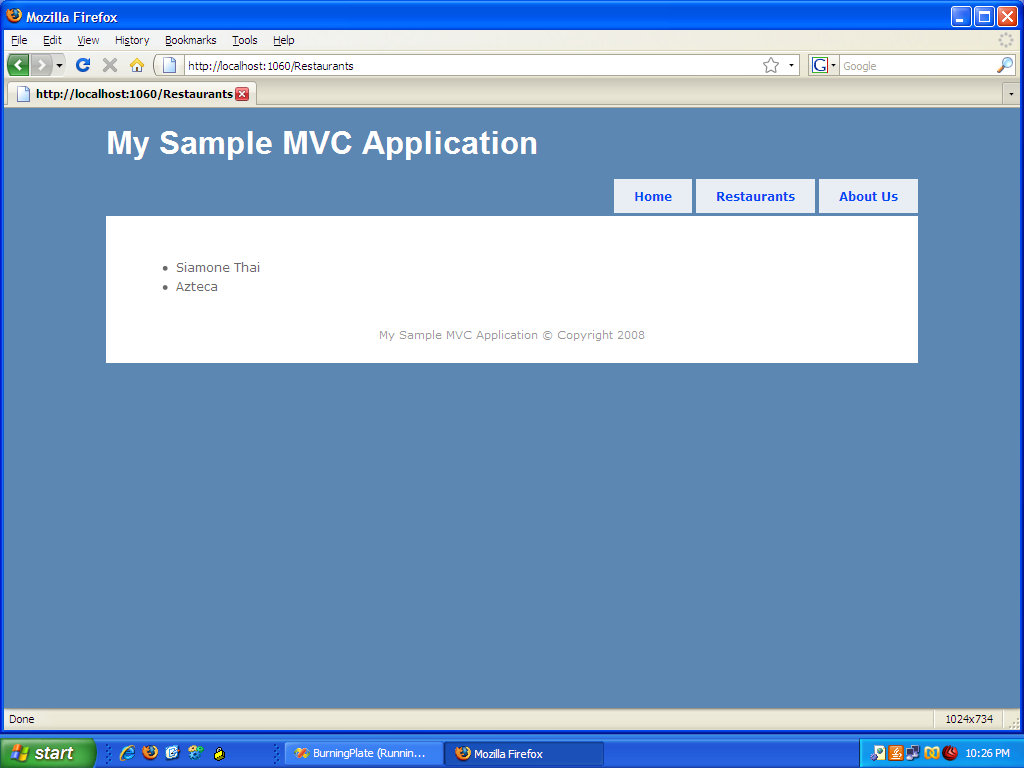
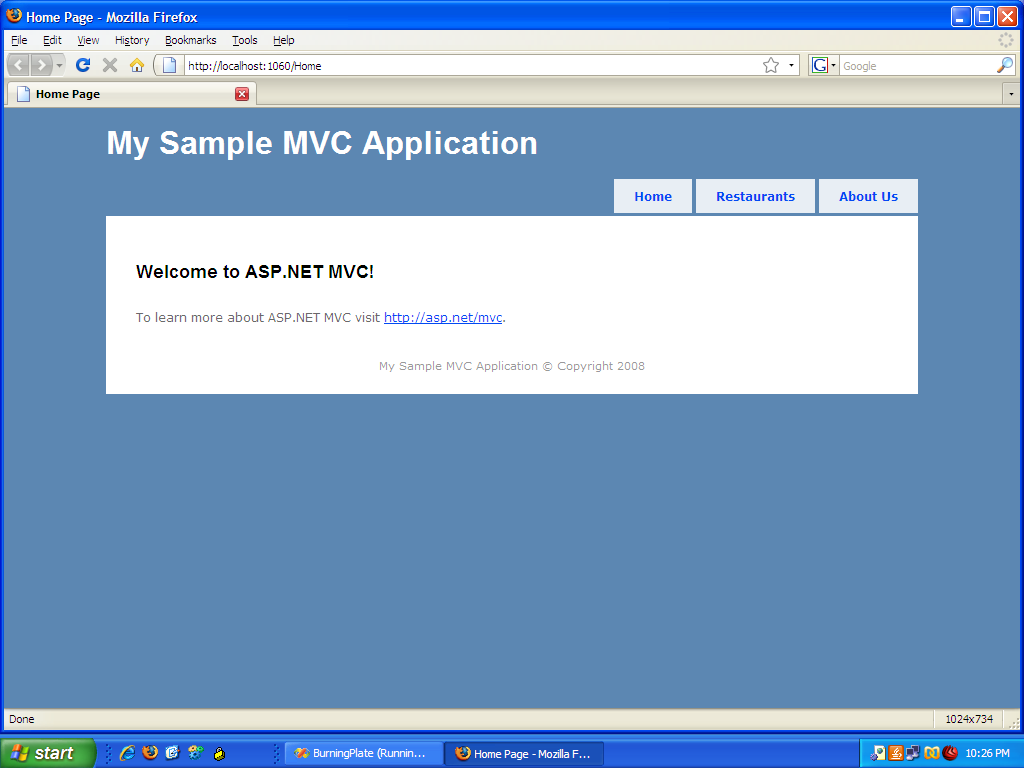
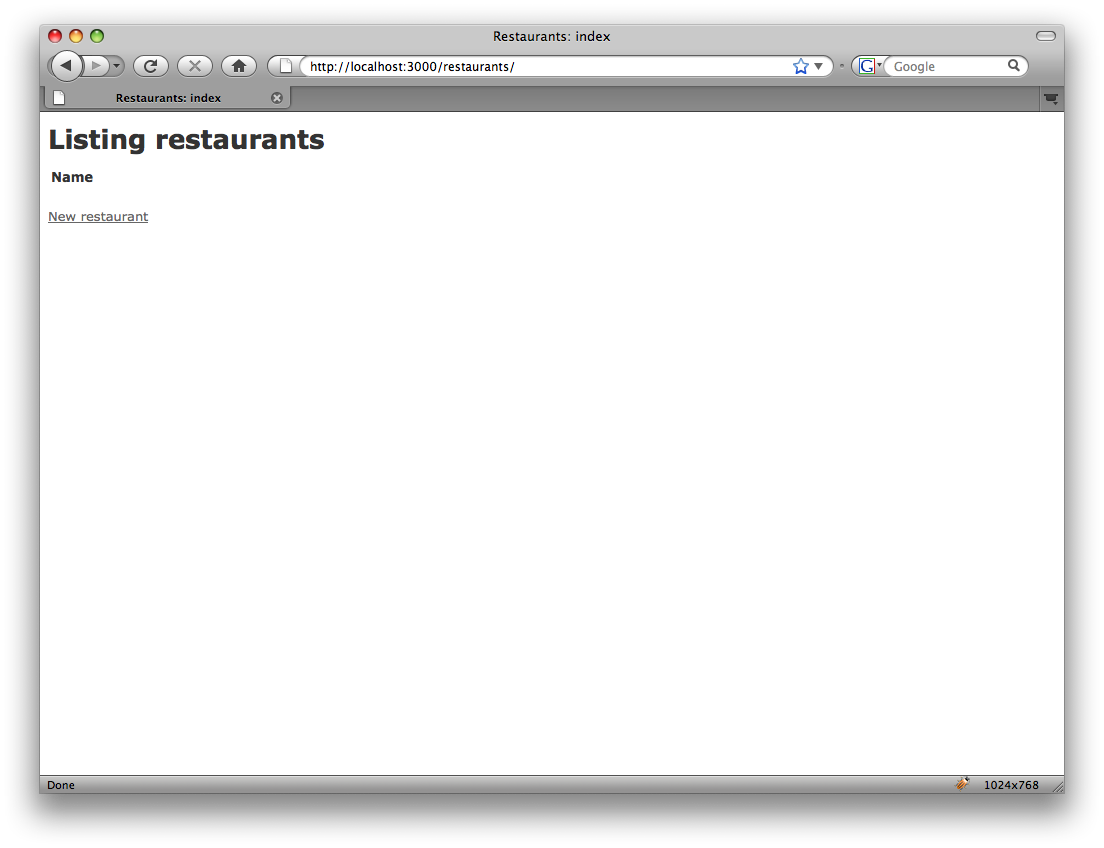
Now that we have a controller and a view, let’s check out our
work by going to /restaurants/.
As a final touch, let’s add a link to the home page to get to
our new restaurants index view. To do that, open the Site.Master
view and between the Home and About Us links, add a call to
Html.ActionLink to build our link.
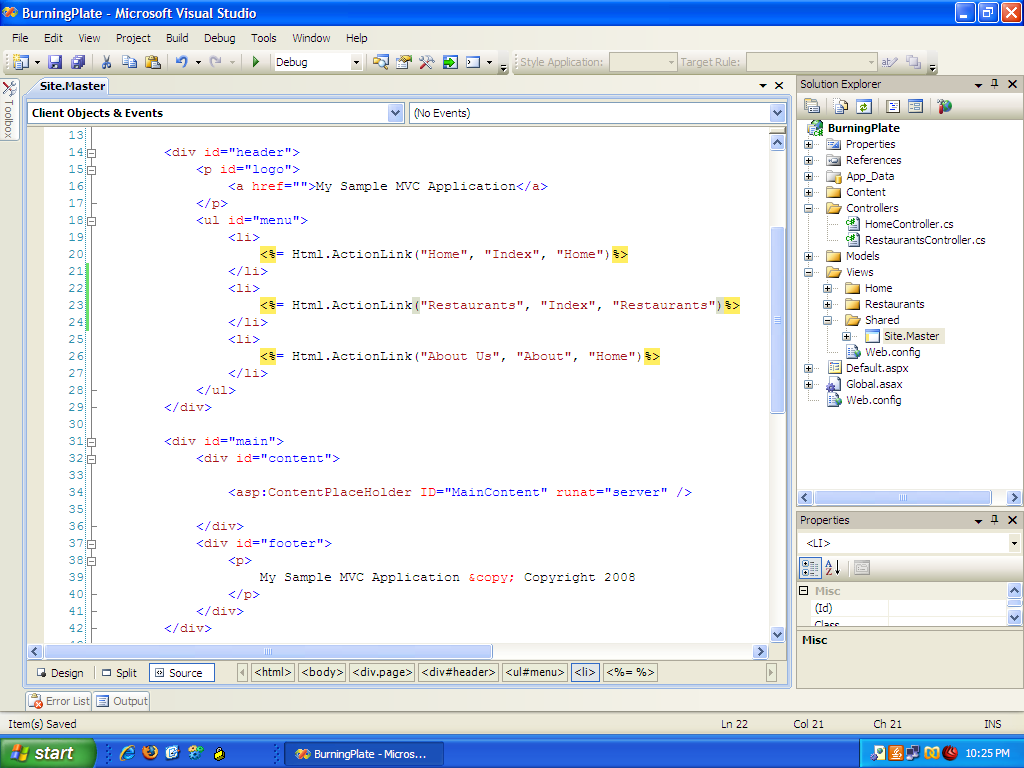
<li>

    <%= Html.ActionLink("Restaurants", "Index", "Restaurants")%>

</li>
Hardcoding links suck. MVC takes care of this by using the routing
tables to create a link using the controller and action names.
This means that if the controller or action names change, the links
to then automatically change as well. No need to go rooting through code
to update links.
Let’s check out our link to make sure it works.
CakePHP
Unlike .NET MVC, CakePHP has CRUD scaffolding already built into
the framework. Because of this, we’re going to create our
controller first and then create our data.
Creating the Controller
Just like when we created our model, we’ll use
cake bake to create the controller for us.
claco@mbp ~/mvc-marathon/cakephp/BurningPlate $ cake bakeWelcome to CakePHP v1.2.0.7296 RC2 Console
-——————————————————————————————
App : BurningPlate
Path: /Users/claco/mvc-marathon/cakephp/BurningPlate
-——————————————————————————————
Interactive Bake Shell
-——————————————————————————————
[D]atabase Configuration
[M]odel
[V]iew
©ontroller
[P]roject
[Q]uit
What would you like to Bake? (D/M/V/C/P/Q)
> C
-——————————————————————————————
Bake Controller
Path: /Users/claco/mvc-marathon/cakephp/BurningPlate/controllers/
-——————————————————————————————
Possible Controllers based on your current database:
1. Restaurants
Enter a number from the list above, type in the name of another controller, or 'q' to exit
[q] > 1
-——————————————————————————————
Baking RestaurantsController
-——————————————————————————————
Would you like to build your controller interactively? (y/n)
[y] >
Would you like to use scaffolding? (y/n)
[n] > y
The following controller will be created:
-——————————————————————————————
Controller Name: Restaurants
var $scaffold;
-——————————————————————————————
Look okay? (y/n)
[y] >Creating file /Users/claco/mvc-marathon/cakephp/BurningPlate/controllers/restaurants_controller.php
Wrote /Users/claco/mvc-marathon/cakephp/BurningPlate/controllers/restaurants_controller.php
Cake test suite not installed. Do you want to bake unit test files anyway? (y/n)
[y] >You can download the Cake test suite from http://cakeforge.org/projects/testsuite/
Baking unit test for Restaurants…
Creating file /Users/claco/mvc-marathon/cakephp/BurningPlate/tests/cases/controllers/restaurants_controller.test.php
Wrote /Users/claco/mvc-marathon/cakephp/BurningPlate/tests/cases/controllers/restaurants_controller.test.php
-——————————————————————————————
Interactive Bake Shell
-——————————————————————————————
[D]atabase Configuration
[M]odel
[V]iew
©ontroller
[P]roject
[Q]uit
What would you like to Bake? (D/M/V/C/P/Q)
> Q
Here we’ve asked to create a new controller. Cake knew what models
and tables we have and prompts us to choose one. It also asked if
we want to use scaffolding and create unit tests.
<?php
class RestaurantsController extends AppController {var $name = 'Restaurants';
var $scaffold;
}
?>
As we see form the controller that was created, the only code
needed to CRUD data is var $scaffold;. Also, just
like .NET MVC, the class is named RestaurantsController, which
routing will map to the /restaurants/ path.
Creating the View
Because we’ve chosen to use scaffolding, the views and all of the
necessary code needed to maintait the restaurants table is already
taken care of. Let’s take a look at what it provides:
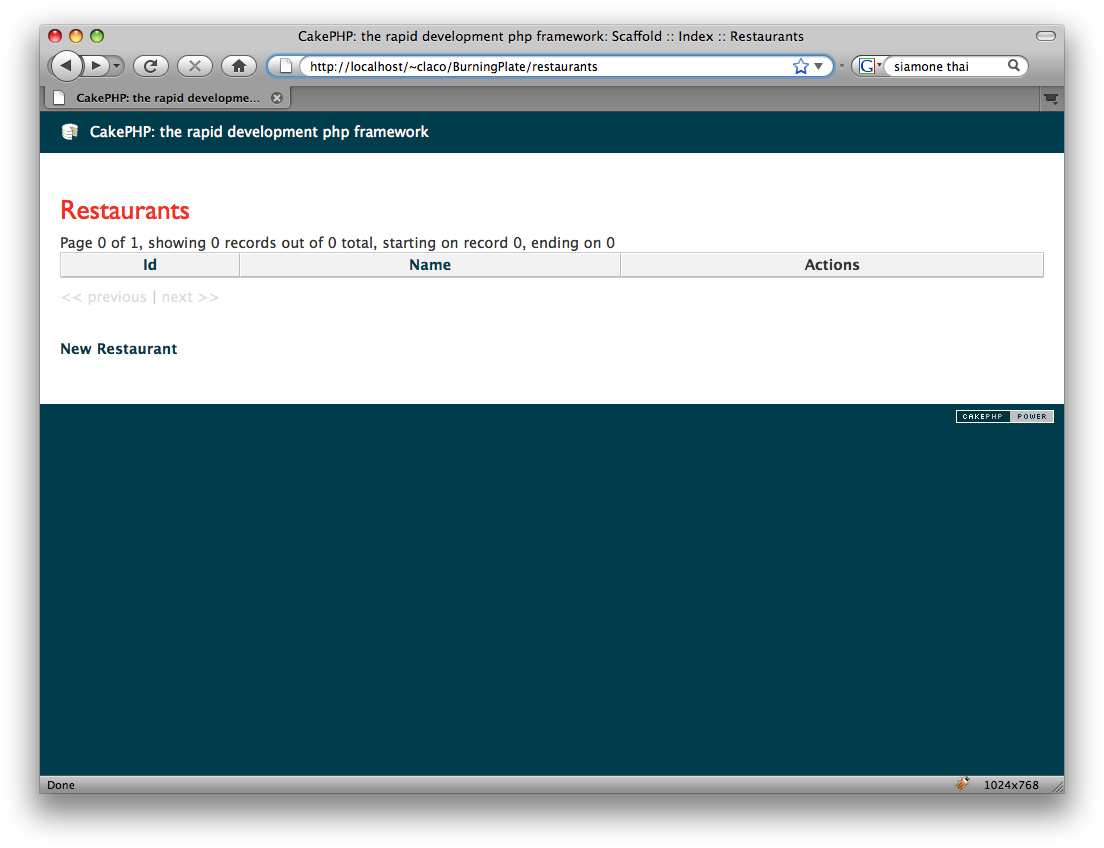
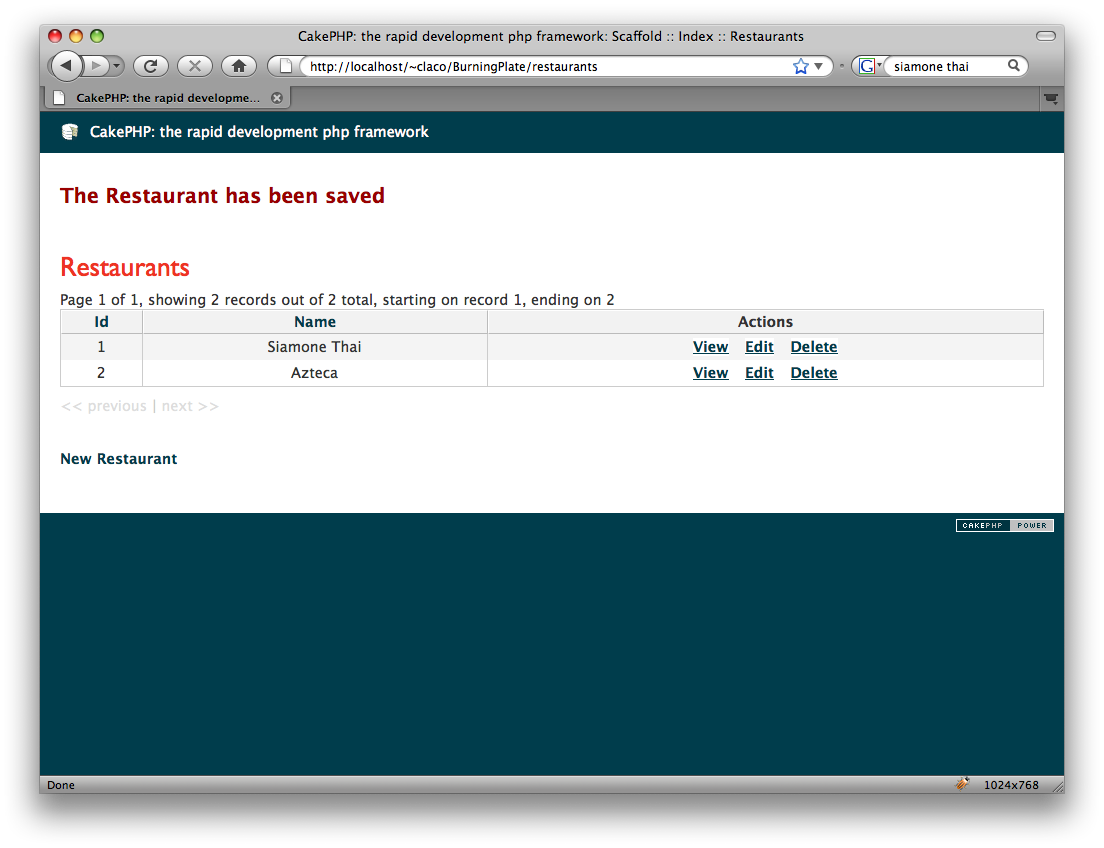
With one variable, we have a full working scaffolding to manage
our data. Now, let’s add a link to the front page going to our
new restaurants controller.
To add our link we need to edit the home.ctp page in the Views
fåolder.
<a href="<?php echo Router::url(array('controller' => 'Restaurants', 'action' => 'index'));?>">Restaurants</a>
Just like .NET MVC, we’re using the routing information to
generate a link rather than hard coding it, passing in the
controller name and the action we’re linking to. Now that should
appear on the default home page.
Catalyst
Because Catalyst doesn’t force any specific ORM upon you, that
also means that there is no official CRUD or scaffolding support
out of the box. Depending on the ORM you choose, there are some
pretty good options.
Class::DBI users have Catalyst::Enzyme.
Rose::DB users have Rose::DBx::Garden::Catalyst
(based on CatalystX::CRUD). While there are CatalystX::CRUD Models
, you still have to write forms views and processing for it.
There is also Catalyst-Example-InstantCRUD seems to be old and dead.
There’s also CatalystX::ListFramework and CatalystX::ListFramework::Builder
which requires some wireup work for the former and the latter
creates an entire application, apparently separate from the public application.
Since we’re using DBIx::Class, and the current options don’t meet
our needs without a divergence from this series, we’ll skip CRUD
scaffolding for the time being.
Creating the Data
Since we have no CRUD scaffolding, we need to create the data the
old fashioned way. You have to choices. First, use the dbicadmin script
to run insert statements. Second, use the sqlite command line
utilities to run SQL insert statement. I chose the latter. I won’t
cover that utility usage here.
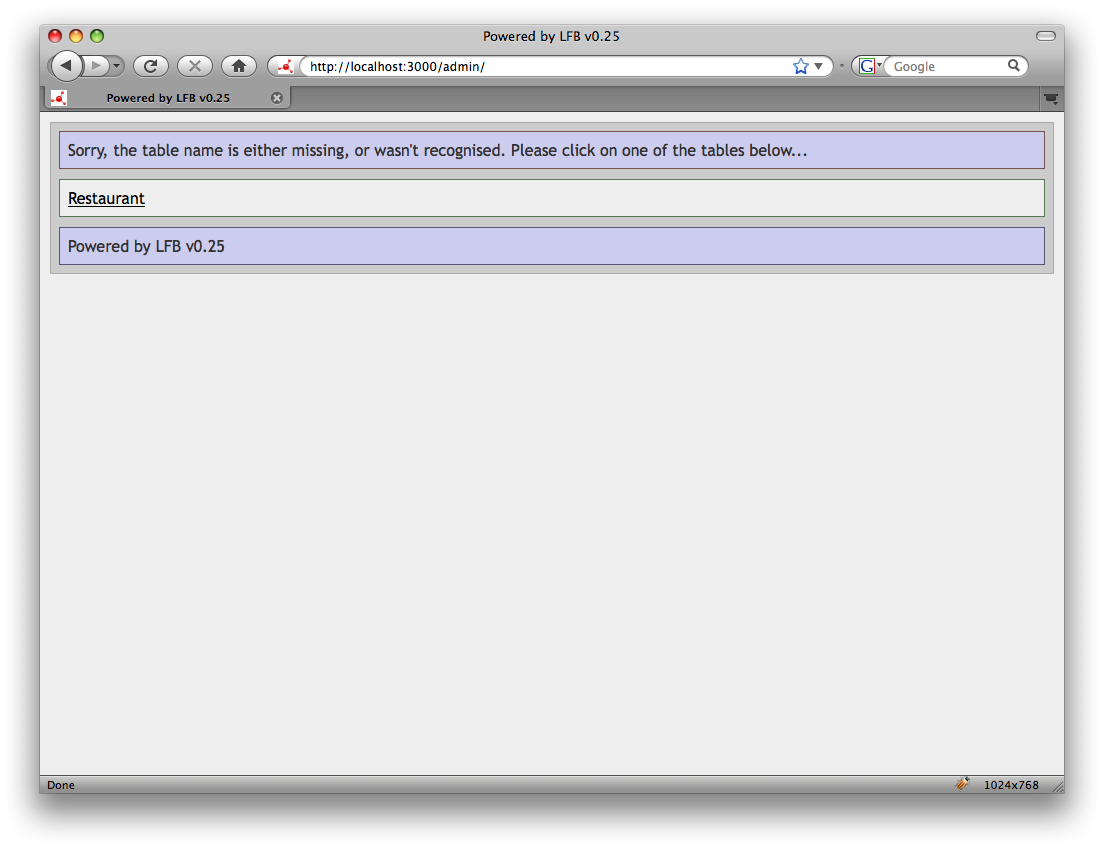
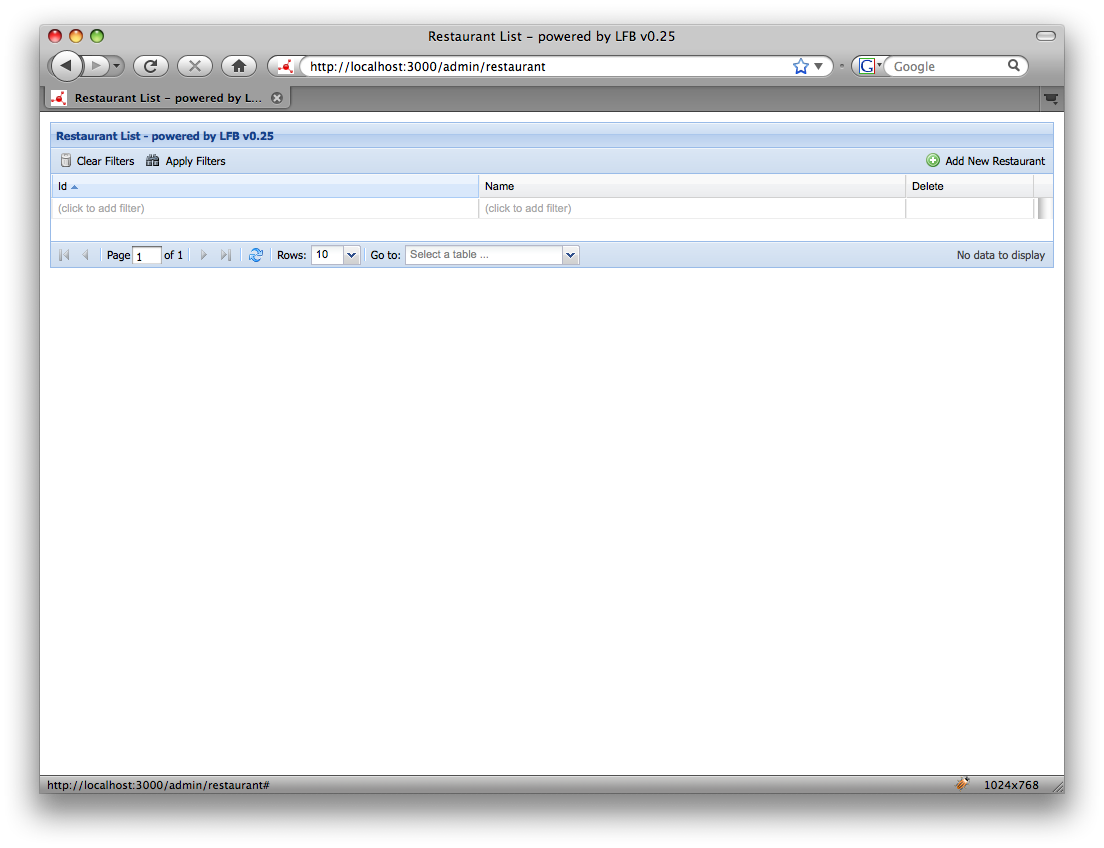
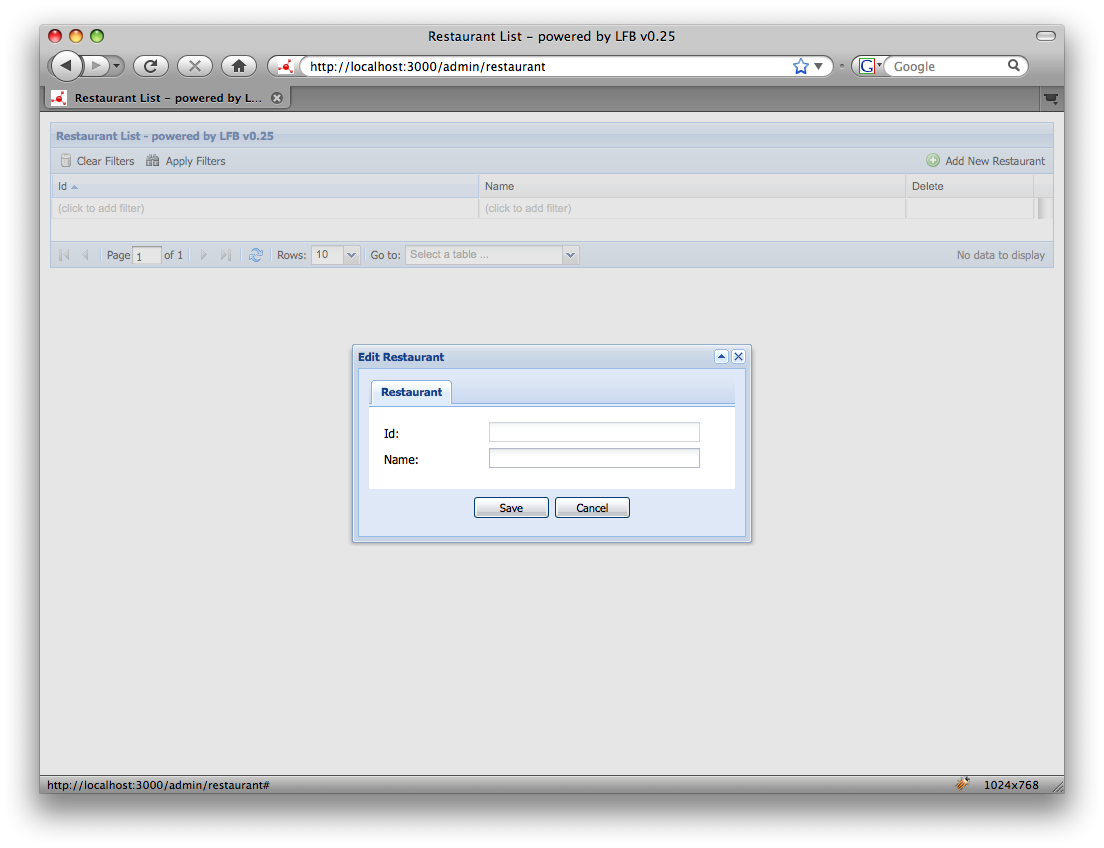
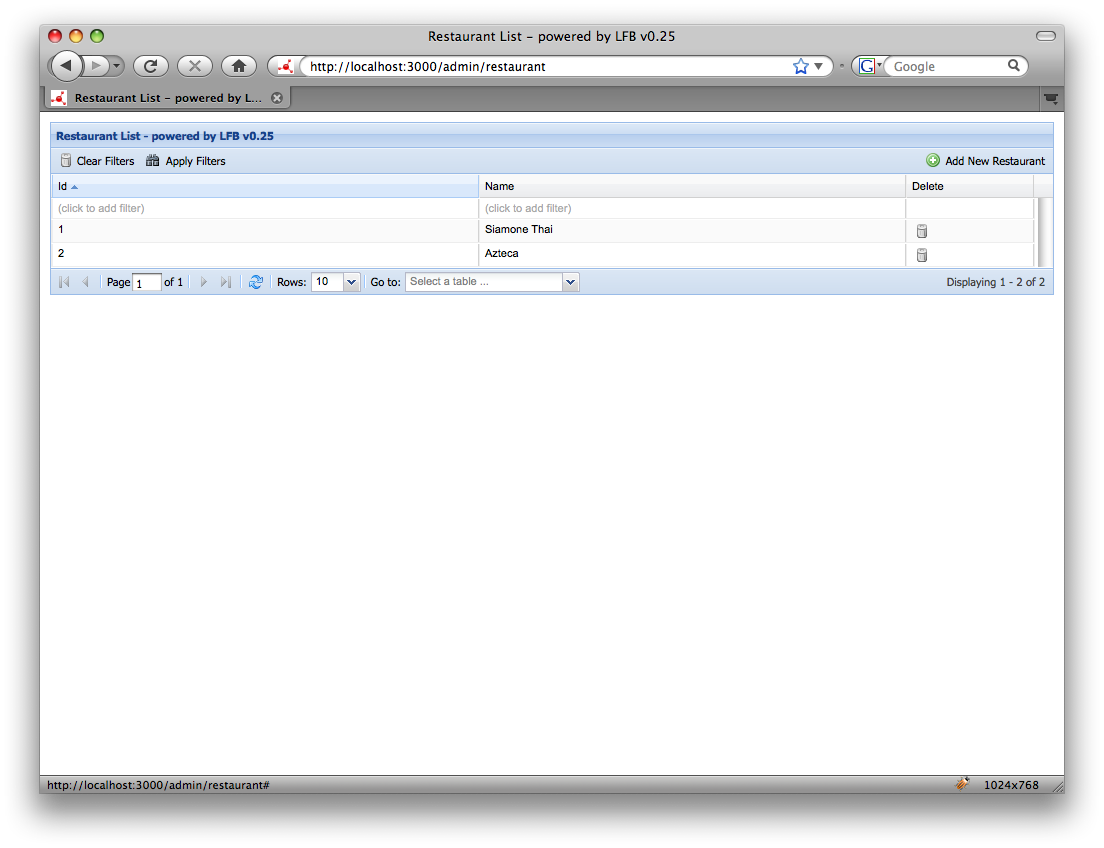
To add the CRUD scaffolding to our add, we need to load the CatalystX::ListFramework::Builder plugin, point it to our extjs javascript files and tell it to live in the admin url space.
To load the plugin, simple add it to the
# Start the application
__PACKAGE__->setup(qw/
    -Debug
    ConfigLoader
    +CatalystX::ListFramework::Builder
    Static::Simple
/);
Now we need to tell it where our ExtJS files are located. We do this by adding enries to our configuration file for the plugins root controller. This is covered in its documentation. While we’re in the config file, we can also tell it to put the CRUD in the admin url namespace:
extjs2   /static/extjs
<Controller::LFB::Root>
	<action>
		<base>
			PathPart admin
		</base>
	</action>
</Controller::LFB::Root>
Currently, the CRUD requires it’s own Model to access the database. I expect this will change in the future. In the mean time, we can just create a model that inherits from the model we’ve previously created.
package BurningPlate::Model::LFB::DBIC;

use strict;
use base 'BurningPlate::Model::DB';

1;
The latest versions of LFB automatically detect any models that use DBIC::Schema and adds them to the main admin index page.
Now fire up your application and go to the admin url you specified in config. From there we can use the interface to add data.
Creating the Controller
To create the controller, we’ll just call the scripts/*create.pl
script, giving it the name of the controller to create.
claco@mbp ~/mvc-marathon/catalyst/BurningPlate $ script/*create.pl controller Restaurants

 exists "/Users/claco/mvc-marathon/catalyst/BurningPlate/script/../lib/BurningPlate/Controller"

 exists "/Users/claco/mvc-marathon/catalyst/BurningPlate/script/../t"

created "/Users/claco/mvc-marathon/catalyst/BurningPlate/script/../lib/BurningPlate/Controller/Restaurants.pm"

created "/Users/claco/mvc-marathon/catalyst/BurningPlate/script/../t/controller_Restaurants.t"
The script has created a new controller class for us along with
a unit test file for that controller. Now we need to add code
to retrieve a list of restaurants and send that to a view.
$c->stash->{'restaurants'} = [$c->model('Restaurant')->search->all];
In the code above, we ask the Restaurant model to search for all
restaurant records and assign the results to an array called
restaurants in the stash. The stash is just like the ViewData in
.NET MVC, holding data for the view to access and render.
Creating the View
Now that we have our restaurants, we need a view to display them.
Catalyst doesn’t assume out of the box that your views will be
in any specific language, or even that they will use templates at all.
This means we need to create a view class to render templates and
an actual template.
We’ll use the create.pl script again to create a view class.
claco@mbp ~/mvc-marathon/catalyst/BurningPlate $ script/*create.pl view TT TT

created "/Users/claco/mvc-marathon/catalyst/BurningPlate/script/../lib/BurningPlate/View"

 exists "/Users/claco/mvc-marathon/catalyst/BurningPlate/script/../t"

created "/Users/claco/mvc-marathon/catalyst/BurningPlate/script/../lib/BurningPlate/View/TT.pm"

created "/Users/claco/mvc-marathon/catalyst/BurningPlate/script/../t/view_TT.t"
Here’s we’ve created a view class using the TT (Template Toolkit)
helper. By default, Catalyst will use the first view it finds as the
default view renderer. If you have multiple views, you can call
the view explicitly or set the default_view or current_view
config options.
Now we need to create a template for our controller. Just like
.NET MVC above, the TT view will look for a template file matching
the controllers name and action. In our case, the file would be
named index.tt in a restaurants folder in the root directory.
You can override the name of the template using the template
stash variable.
<ul>

[% FOREACH restaurant IN restaurants ]

	<li>[ restaurant.name ]</li>

[ END %]

</ul>
Just like the index template for .NET MVC, we simply use the template
language of choice to create an unordered list, loop through each
restaurant and print out the name.
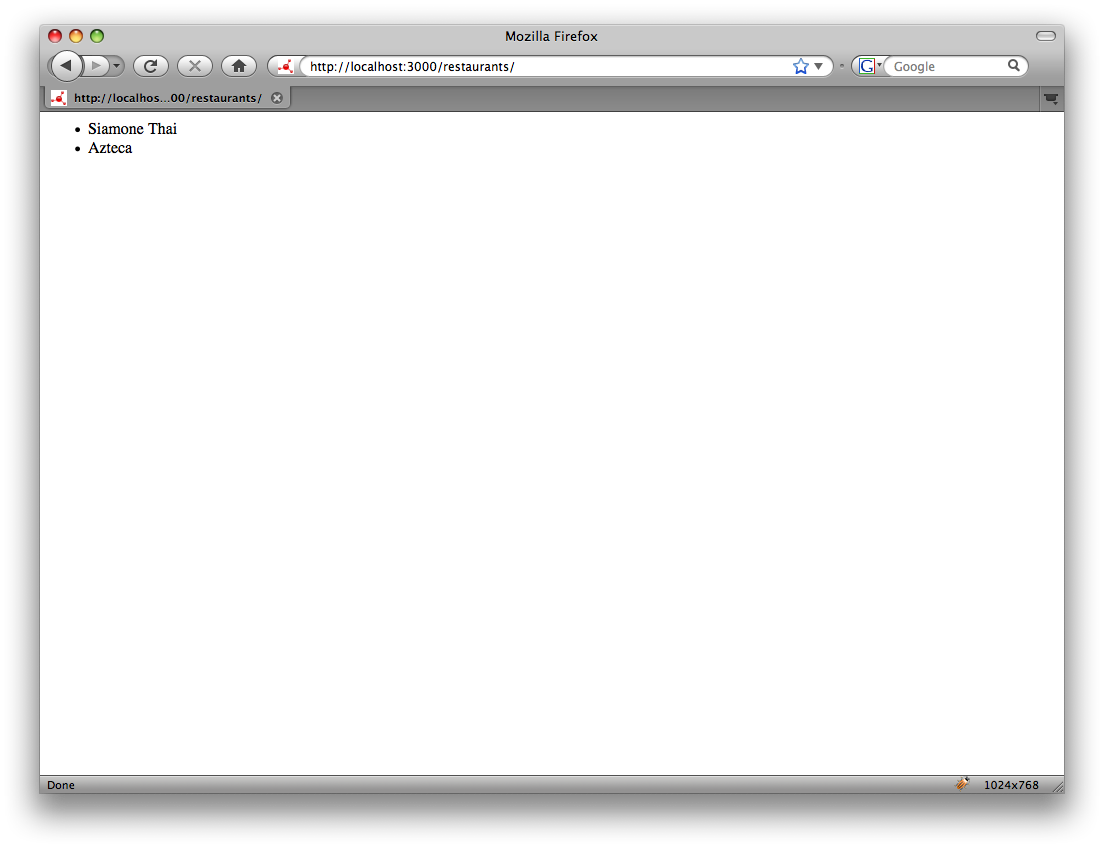
Now that we have our view, let’s check out our restaurants list
by going to /restaurants/. Just like Cake and .NET, the path is
derived form the name of the class. Unlike Cake and .NET, there
is no central routing configuration to tweak if you need to
change the urls. Instead, you can simply change the path
configuration variable in each controller. You can however change
that config parameter within the main configuration file too,
so I guess there technically is a central routing table. :-)
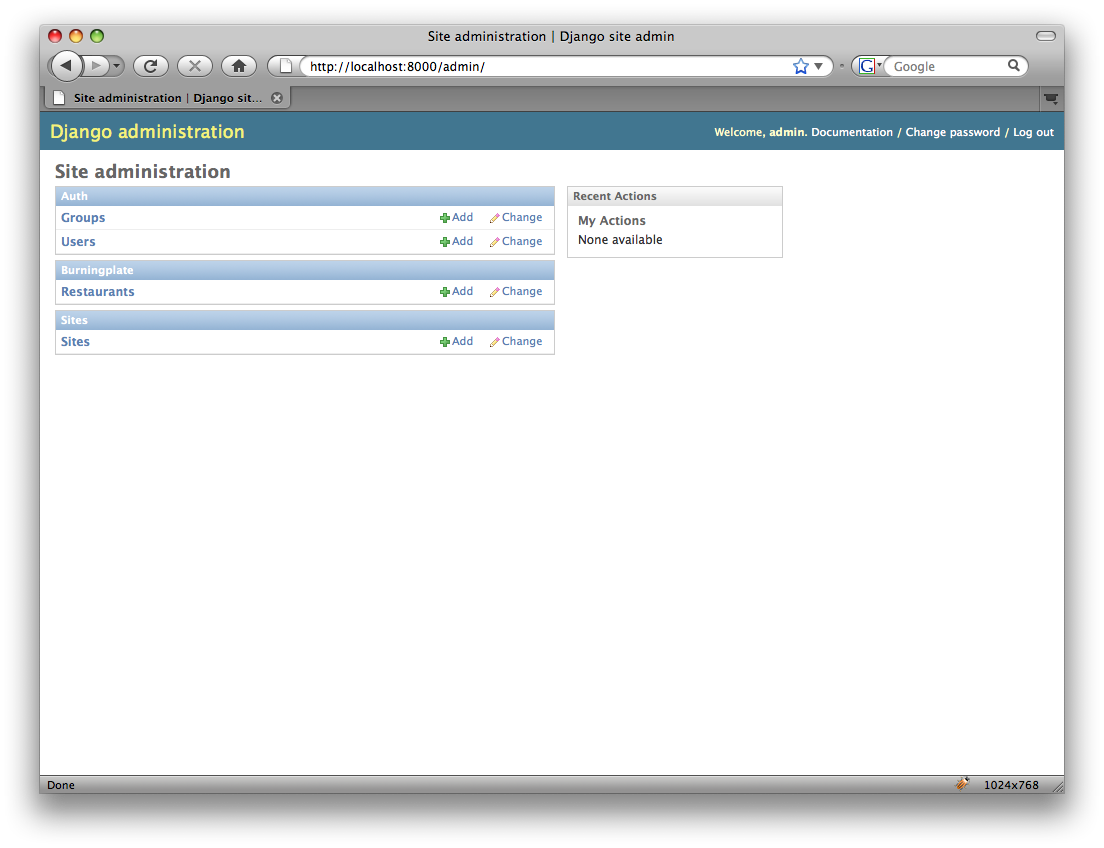
Django
Because Django was born our of the publishing industry, it has
very strong CRUD/scaffolding support out of the box. One needs
only to load the “admin” modules in their configuration, tell
it what models to administer, set the admin url and create
the necessary tables and user using manage.py.
Creating the Data
In our settings.py, we add a line to load the django.contrib.admin
module:
INSTALLED_APPS = (

    'django.contrib.auth',

    'django.contrib.contenttypes',

    'django.contrib.sessions',

    'django.contrib.sites',

    'django.contrib.admin',

    'BurningPlate'

)
Now we need to tell the admin code which models to administer. We can
do this anywhere, but I’ll put it in our model for now.
admin.site.register(Restaurant)
Now we need to tell Django what url to use for admin access. To do this,
all we have to do is uncomment some like already in the urls.py file:
from django.conf.urls.defaults import *
- Uncomment the next two lines to enable the admin:
from django.contrib import admin
admin.autodiscover()urlpatterns = patterns('',
- Example:
- (r'^BurningPlate/', include('BurningPlate.foo.urls')),
- Uncomment the next line to enable admin documentation:
- (r'^admin/doc/', include('django.contrib.admindocs.urls')),
- Uncomment the next line for to enable the admin:
(r'^admin/(.*)', admin.site.root),
)
Now that we loaded the admin code and told it which models to administer,
we need to update the database to include the necessary admin related
tables. To do this, simply run syncdb.
claco@mbp ~/BurningPlate $ python manage.py syncdb
Creating table auth_permission
Creating table auth_group
Creating table auth_user
Creating table auth_message
Creating table django_content_type
Creating table django_session
Creating table django_site
Creating table django_admin_log
Creating table BurningPlate_restaurantYou just installed Django's auth system, which means you don't have any superusers defined.
Would you like to create one now? (yes/no): yes
Username (Leave blank to use 'claco'): admin
E-mail address: claco@chrislaco.com
Password:
Password (again):
Superuser created successfully.
Installing index for auth.Permission model
Installing index for auth.Message model
Installing index for admin.LogEntry model
Django created the needed tables for us and also prompted us to create
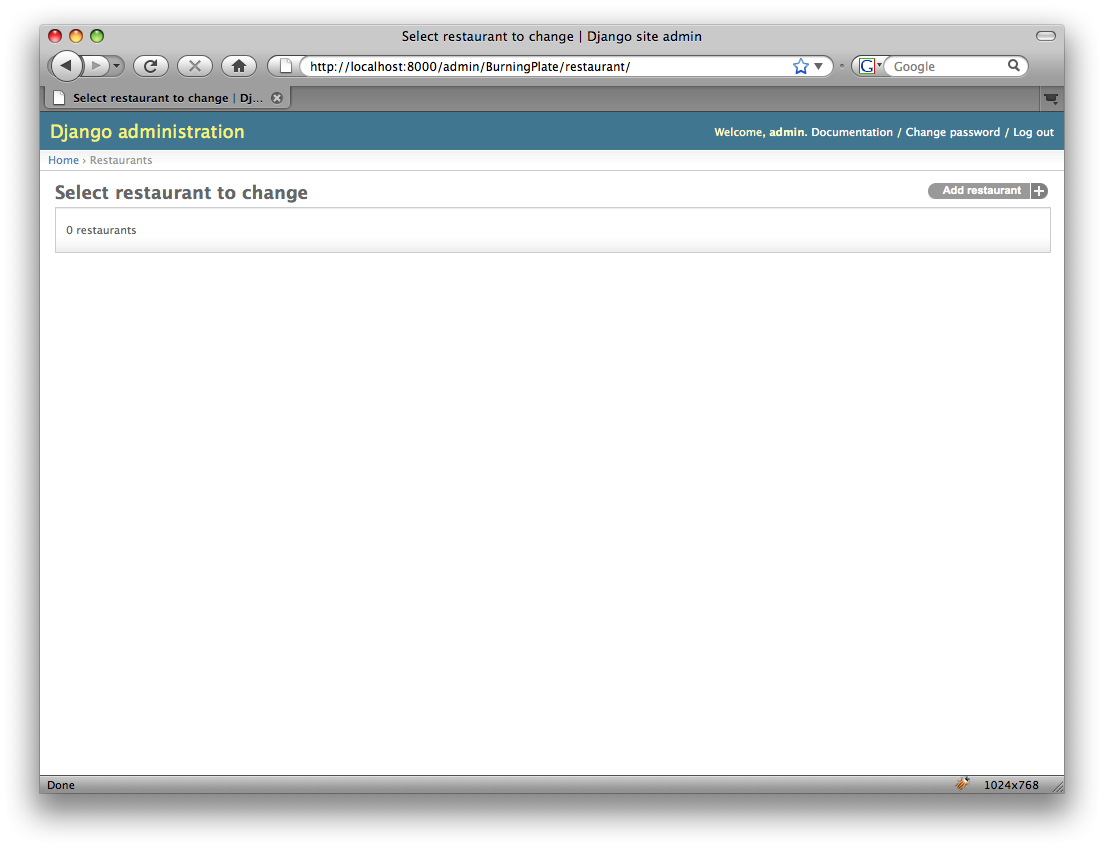
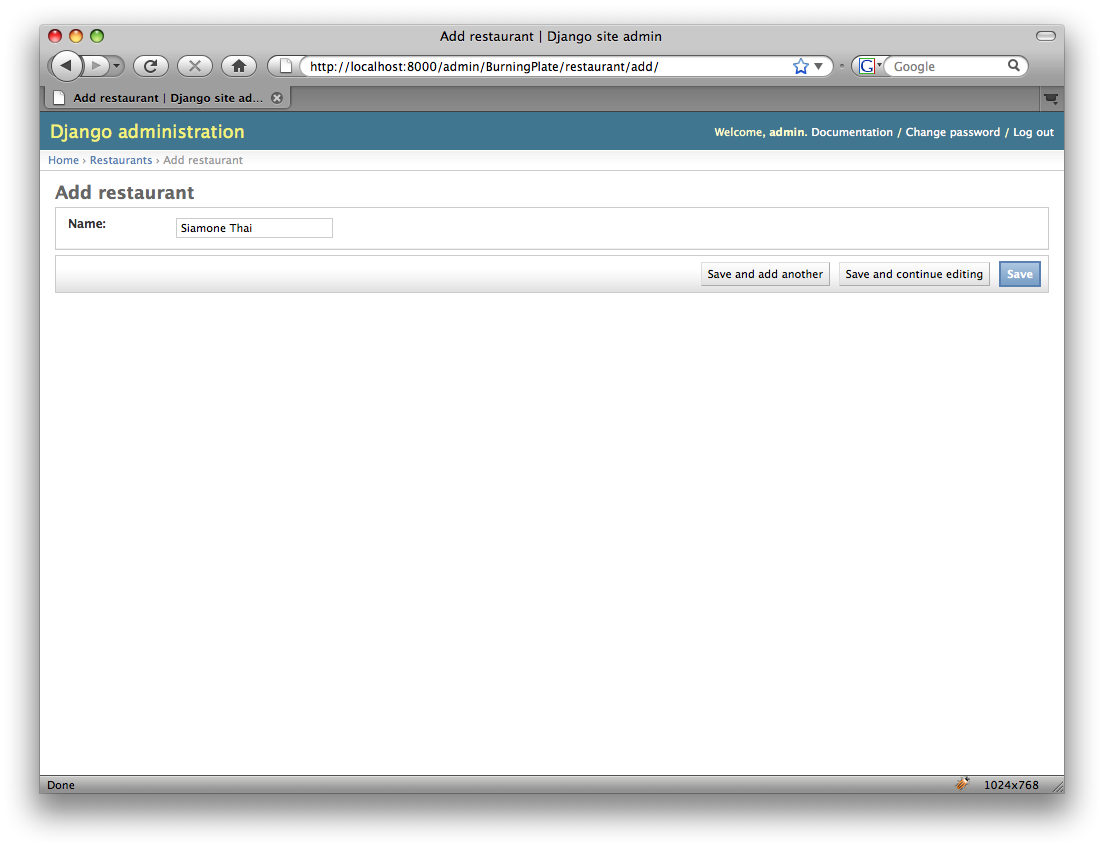
a username/password for access. Now let’s check out the admin web
interface. and add our data.

Creating the Controller
While Django is an “MVC” like framework, it considers the Controller
to be the “view”, and the View as the “template”. Aside from this
naming juggle, it’s still the same in practice: a separation of
getting the data and displaying the data.
To create our controller, simply create a restaurants directory
and define the views for it.
from django.shortcuts import render_to_response
from BurningPlate.models import Restaurantdef index(request):
restaurants = Restaurant.objects.all()
return render_to_response('restaurants/index.html', {'restaurants': restaurants})
In the code above, we loaded request handling modules, loaded our
Restaurants model and defined an index action that loads all restaurants
and renders the index.html template, passing it the restaurants list in much
the same we use the stash in Catalyst of the ViewData in .NET.
Like Catalyst, the template can be named anything you want it to be.
Unlike the other frameworks, url mapping is a manual process. To
expose the restaurants controller, we need to add it to our urls.py
file:
(r'^restaurants/$', 'BurningPlate.restaurants.views.index')
Creating the View
By default, Django looks for
its templates in a path outside of the application root.
For the sake of keeping it all in the same directory in the
repository, I’ve tweaked the config to point to the current
directory as the root template directory.
TEMPLATE_DIRS = (
- Put strings here, like "/home/html/django_templates" or "C:/www/django/templates".
- Always use forward slashes, even on Windows.
- Don't forget to use absolute paths, not relative paths.
"."
)
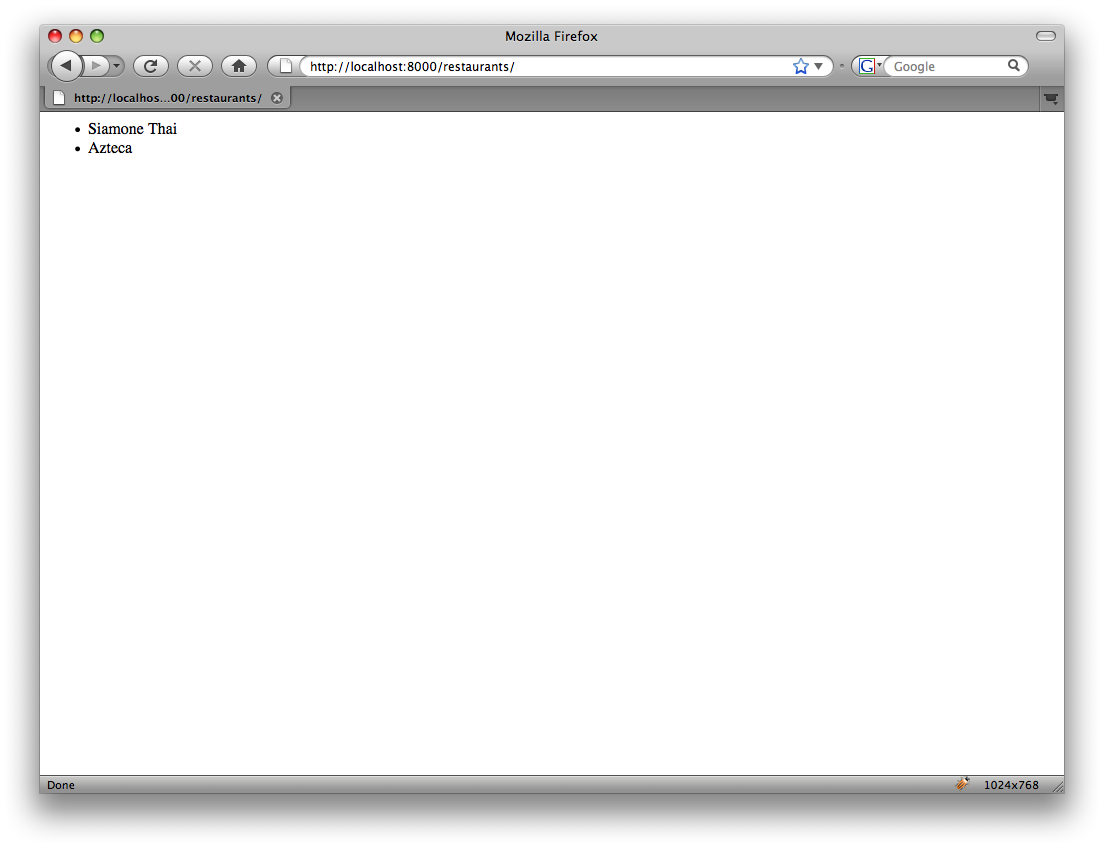
Now in our restaurants directory, we create an index.html with
the code to print out the restaurants.
<ul></ul>
Looks familiar doesn’t it? Let’s check it out in our browser.
Ruby on Rails
Unfortunately for me, I upgraded to Leopard, which means I also got
the latest Rails 2.1. The scaffolding in 2.1 has changed from
previous versions. It also apparently can’t be added to an existing
model as it insists on creating it’s own model as part of the process.
This means we have to ditch the model we built in the last
article.
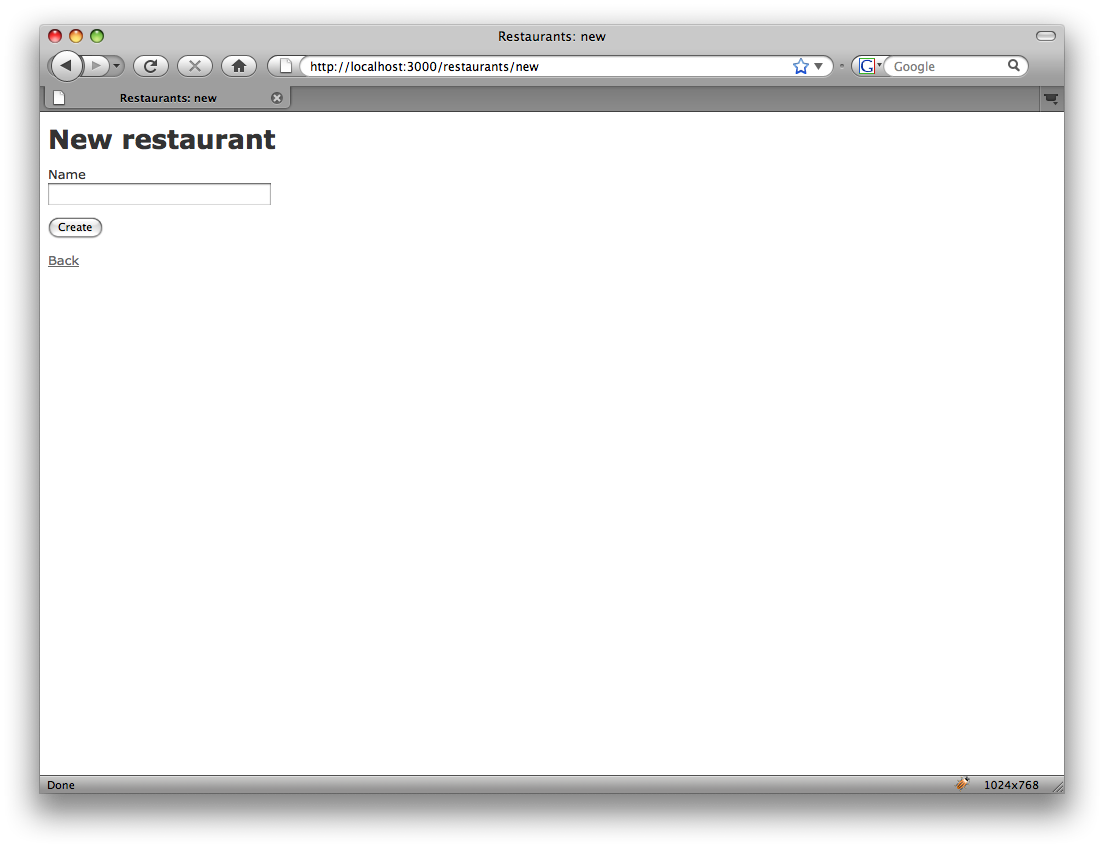
Creating the Controller/View/Data
To create the controller and scaffolding, simply run the generate
scaffold command, passing it the name of the model and the fields
to create:
claco@mbp ~/mvc-marathon/rails/BurningPlate $ script/generate scaffold restaurant name:string

    exists  app/models/

    exists  app/controllers/

    exists  app/helpers/

    create  app/views/restaurants

    create  app/views/layouts/

    exists  test/functional/

    exists  test/unit/

    create  public/stylesheets/

    create  app/views/restaurants/index.html.erb

    create  app/views/restaurants/show.html.erb

    create  app/views/restaurants/new.html.erb

    create  app/views/restaurants/edit.html.erb

    create  app/views/layouts/restaurants.html.erb

    create  public/stylesheets/scaffold.css

    create  app/controllers/restaurants_controller.rb

    create  test/functional/restaurants_controller_test.rb

    create  app/helpers/restaurants_helper.rb

     route  map.resources :restaurants

dependency  model

    exists    app/models/

    exists    test/unit/

    exists    test/fixtures/

    create    app/models/restaurant.rb

    create    test/unit/restaurant_test.rb

    create    test/fixtures/restaurants.yml

    exists    db/migrate

    create    db/migrate/20080731023309_create_restaurants.rb
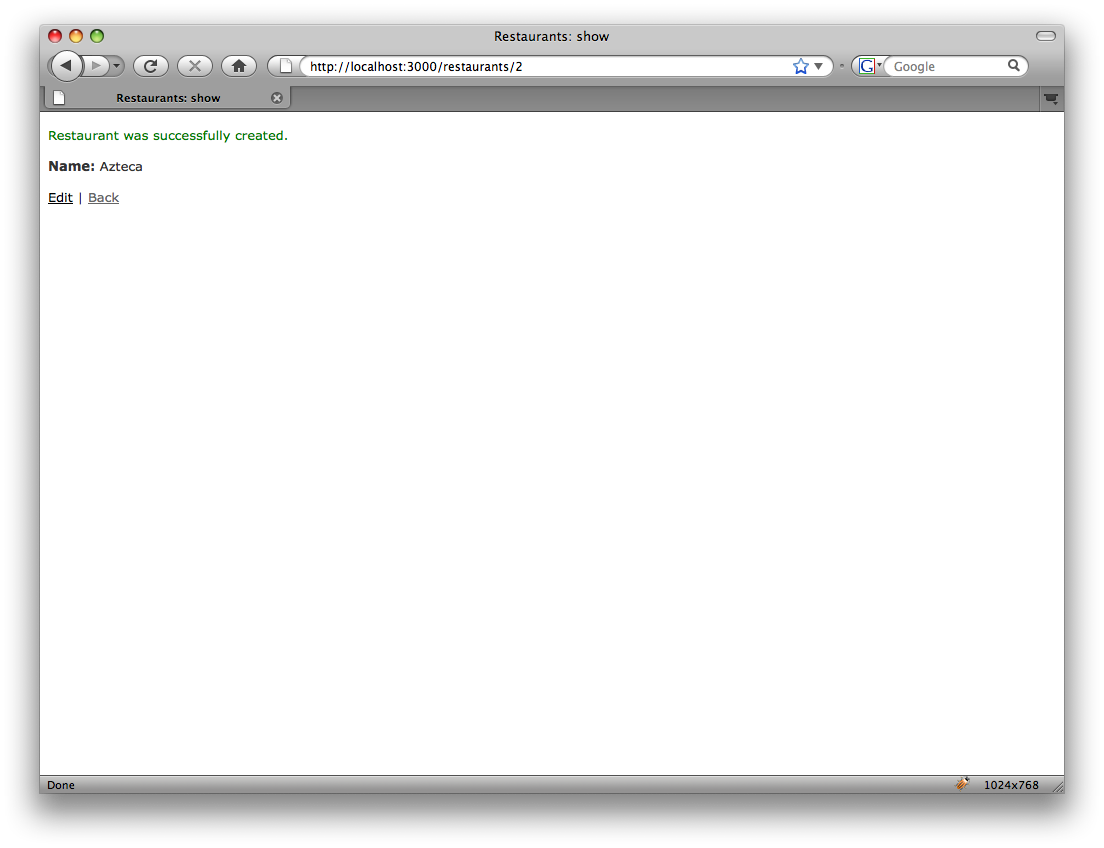
As you can see, this created everything we need to get started.
The mode, the migration, the views, the controller and the
tests/test fixtures. Normally you would run rake db:migrate to
setup the database. But because we’ve already done the same in our
previous article, we don’t need to do that here.
Let’s check out what we have in the browser.
Conclusions
-
It would be nice if ASP.NET MVC, Catalyst and Django created
controllers that pushed the idea of using an app level
base class like Cake and Rails do. I hear “use a base class”
all the time in Catalyst discussions in response to people
wanting to create plugins. It would be better for the new
user to be led to practice what is preached. -
While Rails scaffolding is nice and can be customized,
it can’t be added to and existing controller/model. This means
you need to know that you have to use it first. It would be
much more useful if you could at least point it to an existing
model. -
CakePHP scaffolding is quite nice but it’s not very easy
to customize like the Django admin section is. It is pretty
easy to move into an admin set of controllers namespace though.Ruby strikes a nice balance here as well. It generates CRUD scaffold for you, but in the end it’s just code on your app you can tweak any way you want.
-
Django admin scaffolding is the bomb. It’s in it’s own
directory with authentication already rolled in. -
CRUD scaffolding in Catalyst is mostly non existent
for the DBIx::Class user (the ORM pushed in the tutorials)
unless you’re willing to write some glue classes. If you’re running
Rose::DB as your ORM, you’re golden. The ListFramework is promising and so is the CatalystX::CRUD stuff. I imagine that given some time, it will have strong CRUD like Django does. -
.NET MVC falls flat in the CRUD Scaffold arena.